Bursting Through Paper Bursting Through Paper
This very convincing 3D effect is done in Photoshop.
Because there are several steps involved, and several different procedures, I'll classify this an intermediate tutorial. But if you are a beginner with ambition, and you like this effect, go for it! Just be patient with yourself as you learn the new techniques.
As we create this wonderful illusion, we'll be working with these:
- Problem-solving in Photoshop.
- Moving an object in a photo.
- Creating a Grayscale using Channel Mixer.
- Using the Lasso and the Polygonal Lasso.
- Creating and using a custom gradient.
- Using a Layer Mask.
- Reducing the size of a layer using a transformation.
- Using the Paintbrush tool.
|
This tutorial was written for Photoshop version 7, though it will work fine any version, and probably other software, too. My main point in this tutorial is to show you how I reproduce the illusion, and that isn't software specific! Since you're most certainly using a version newer than 7, your screen will vary slightly from my screenshots.
* Please see note at bottom re use of my photo.*
|
|
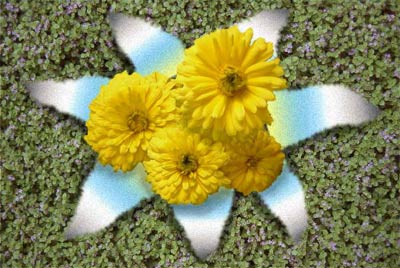
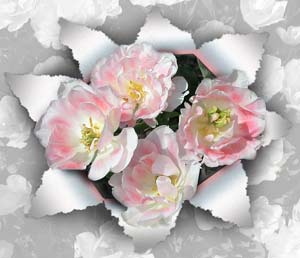
1. Plan your project.
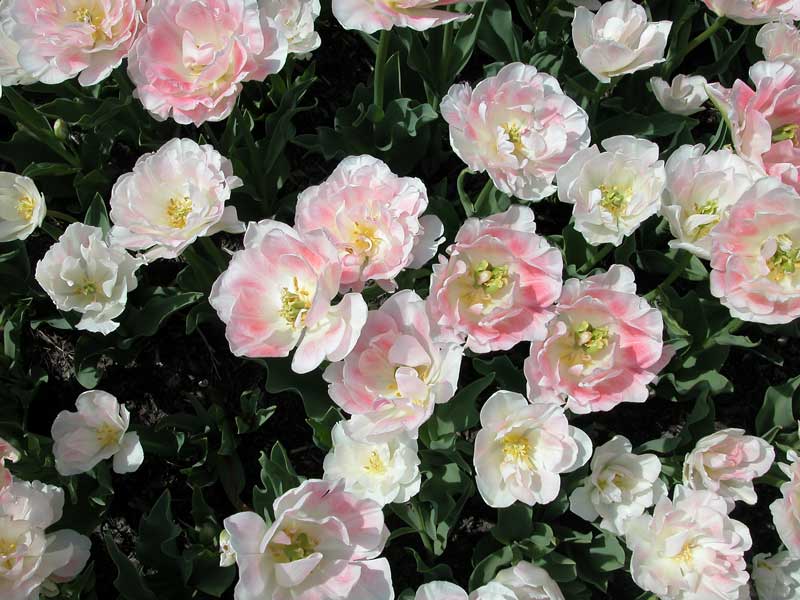
Most of my art projects happen by serendipity. This is one of the rare ones that I planned exactly how I wanted it, and set out to make it look as it did in my mind. I envisioned a page of pale desaturated flowers. Then, bursting through this page, tearing the paper back as they came through, I saw a group of coloured flowers.
I began with this photo of tulips, taken at the Indianapolis Flower & Patio Show, a most welcome event for February in Indiana!
|
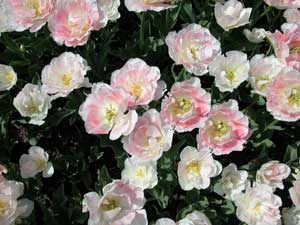 |
If you want to "nab" my tulip photo:*
- Click it to go to the full-sized version.
- Right-click this, choose Save As, and put it where you will be able to find it.
- Alternatively, you can drag this larger image directly into Photoshop or Elements!
|
 |
|
Because I envisioned a GROUP of the flowers bursting through, I created a grouping of four:
- Carefully trace the tulip on the right with the Lasso.
- Layer > Layer via Copy to put a copy of the tulip on its own layer.
- Choose the Move tool.
- Drag the flower toward the group in the center.
My result is the photo in the next frame. (Because of the bursting through effect, you won't notice the duplication of that flower.)
|
2. Ready the photo for the paper to be torn.
For my example, I used a grayscale version of my flowers as the "paper." If you are using a plain colour for your "paper," you can skip this part:
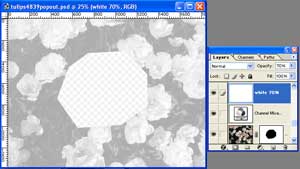
Once I moved that flower, I duplicated that layer. The top one of these will be the tulips bursting through. Turn off its visibility eye.
The other will be the desaturated "paper" layer. I desaturated the paper layer using a Channel Mixer Adjustment Layer: This will become my "paper" through which the coloured flowers will be bursting. Here's how I did my "paper" layer:
- Double-click the paper layer in the Layers palette if it is a background layer. You need it to be a regular layer.
- Click the Create a New Adjustment Layer button at the bottom of the Layers palette.
- Choose Channel Mixer.
- Tick the Monochrome box and then adjust the sliders till you like the look of your grayscale.
|
- Make the translucent white layer:
- Click the Create a New Layer button.
- Fill this layer with white.
- Drag it to above the flower layer.
- Reduce its opacity till you like the look of the "paper."
3. "Cut" that opening in the center.
If you look at this carefully, either at my example, or at a piece of your own paper you tear in this way, you will see that the "hole" is actually a polygonal shape, with straight edges.
- Choose the Polygonal Lasso.
- Tap around to form an irregular polygonal selection.
- Double-click the last point to snap the selection closed.
|
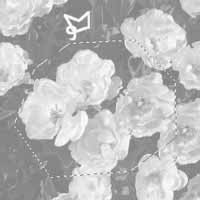 |
- With the selection going and the top flower layer selected, click the Add a Layer Mask button at the bottom of the Layers palette. Your hole will now show through! Yay!
|
 |
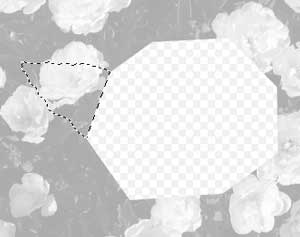
| 4. Make the selection for the first flap.
These are actually not "torn out of" the paper at all. These are painted onto a new layer above the layer we were just working on. Make them one at a time:
- Begin at one corner of the "hole."
- Using the Lasso tool and a shaky hand, click-drag the selection out to a point.
- Keep drawing, still shaking, back to the next vertex of the "hole."
- Release the mouse button to let the selection "snap" closed.
|
 |
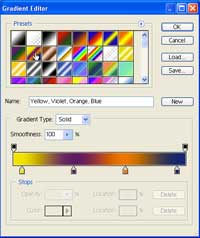
| 5. Make the Gradient.
The flaps will each be filled with a gradient. What gradient you use is up to you, but it should be either linear or reflected. If you choose to make a custom gradient as i did, here's how:
|
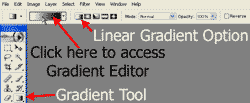 |
- Click the Gradient itself, in the options bar, to access the Gradient Editor.
- From the mass of gradients there, choose something that is similar to what you are going to make, or roughly so. I wanted a simple 4-color gradient, so I began with this ugly one. <g>
|
 |
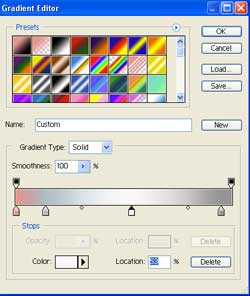
- Click each of the color stops and change its color to what you want.
- I wanted pink on the inside of the flaps to act as sort of a reflection of the tulips.
- I liked a blue in there to give a silvery contrast.
- Then i wanted a dark gray for the ends of the points, so that they seem to lie down against the paper.
- For the high part of the flap to look high, it will need to be the color of your light, or, in my case, white.
|
 |
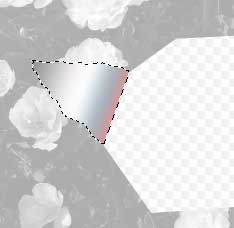
6. Fill in the flaps.
- Make a new layer. Double-click it and label it "flaps."
- Drag the gradient in the tab. It might well take a few tries to get it the way you want it. It must be perpendicular to the straight edge of the hole, or it will not look right.
|
 |
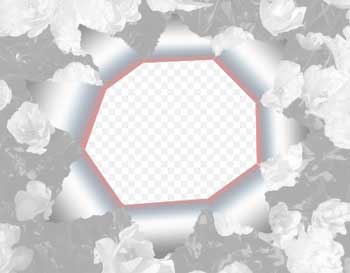
- Make a selection for the next tab, fill, and continue around till you have them all filled.
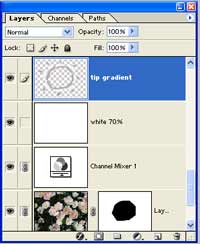
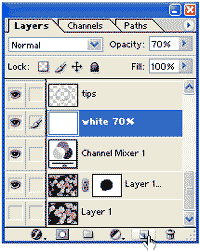
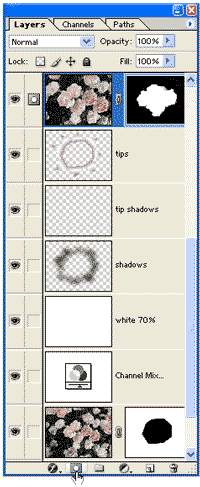
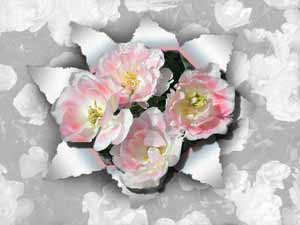
My picture looks like the one at the right, at this point. My Layers palette is just below.
|
 |
|
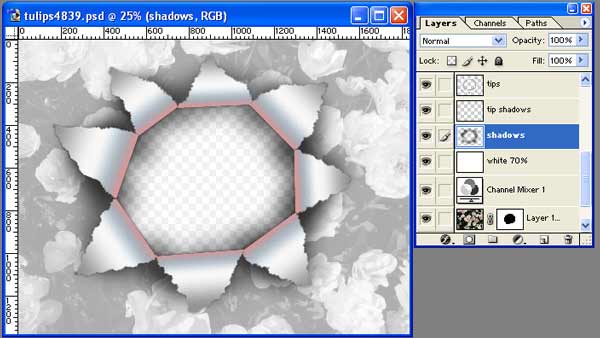
7. Make the flaps look like torn paper.
This is looking pretty good already, but there is more to do.
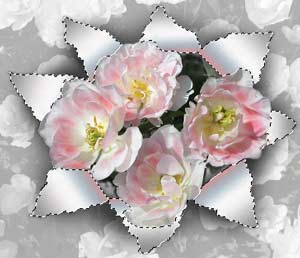
- First, though it is tough to see in my picture above, these edges of the "torn" paper don't look very torn. You will need to smudge them out a bit to make this look right, as i've done to the right. (I've turned off the visibility for the white layer so that the contrast will show these torn edges better.)
Use the smudge tool and a "dotty" sort of brush, one that makes lots of dots. Strive for randomness, as you smudge the torn edges of paper.
- Add a little noise to these flaps to give them some texture.
|
 |
| 8. Make the shadows under the flaps.
We also need to have some shadows, in order to make the paper look 3D. The gradient gives us pretty effective shading on top of the flaps. What we really need is shading UNDER them.
Think for a minute and formulate a plan for how you would do these shadows. Then check the next paragraph to see how I did them.
Create a new layer UNDER the layer where you made the flaps. With black and a large soft brush, spacing about 25% and shape dynamics OFF, paint the shadows under the flaps.
|
|
I wanted the shadows to be a bit more intense under the flaps, so I made another layer and painted some more, with a smaller brush.
|
| 9. Make the burst-through object.
For this, you will use another photo, or, as in my case, another copy of the original photo layer.
- Drag the bursting-through image onto your file, if it isn't already there, and position it above all the other layers in the Layers palette.
In my case, I was using a cutting from this same flower photo, considerably larger than the background flowers, enhancing the feeling of depth.
- If you have trimming to do, as I did, you can do this with a Layer Mask.
- With the top layer chosen in the Layers palette, click the Create a Layer Mask button.
- Click this mask and, use black to paint away the background.
|
 |
| 10. Put shadows under the bursting-through object.
You have at least two ways you can do this. I did it the least destructive way, by keeping the mask intact on my burst-through tulips layer. You can also go ahead and apply the mask to the layer and then make the shadow.
A. Because it is probably easier to do this by applying the mask, i'll tell you how to do that first:
- Click the mask in the Layers Palette and drag it to the trashcan in the lower right.
- When you are asked if you want to Apply, Discard, or Cancel, choose Apply.
- Now you can do your shadow by hand-painting on a separate layer, or you can use a drop-shadow layer style with some manipulation.. but beware a straight drop-shadow!
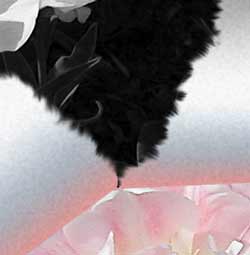
In the image at the right, for example, I've used a straight drop-shadow. This is messing with our eyes. How so? What's wrong with this picture?
Since the object bursting through is 3D, it should cast smaller shadows where it is closer to the background, such as right against the flaps, than it will on the paper under the flaps. If you want to paint your shadows in by hand, proceed to the 4th bullet under B just below.
|
This doesn't work. Why not? |
|
B. If you decide to keep the mask intact, proceed as follows: This is where you will be using a bit of illusion, because you can't really put the shadows under the bursting through layer, if you have masked the layer, as I did. (Why not?)
Instead, you need to make a selection of the appropriate area where you want shadows to appear and then paint them in with a wide soft brush.
For this selection, you want the area that is on the flaps of the torn paper, but NOT on the burst-through object.
- Ctrl-click the layer for the paper flaps. This loads that as a selection.
- Alt-Ctrl-click the mask for the bursting-through image. This subtracts the part of the selection where the bursting-through object overlaps the paper flaps.
|
 |
- Make a new layer above all of the rest.
- Choose a wide soft brush with black as your foreground color. Paint in some very subtle shadows for the flowers.
- You can reduce the opacity of this layer if you like.
- You can do these shadows in the color of the bursting-through object, too, if you like. This would show the reflection of that color, so would add to the realism.
|
 |
| Whew! Lots of steps here, but a fun project. I hope you agree! |
 |
* If you want to work along with me, using this same picture, you have my permission to do so, as long as you do not publish your result in any form.
If you are doing this for an assignment, or you wish to have this on your website, i hope you will use a photo that is meaningful to you. My directions will work for any photo combination for which you can envision this burst-through effect.
|
| Student Work:
|
|
|
RETURN to Janee's Archive Tutorial Index
Ask tutorial questions in the Message Board:

|
| All material in this site is ©2001-2003 by myJanee.com Graphic Creations. No part of it may be used without my written permission. If you have questions or comments about this site or its construction, contact Janee at myJanee.com Graphic Creations by email. |
|
|
|
|