|
There are many great resources on the creation of Celtic Knots. This tutorial presents methods that are good to use if you have a pretty good idea what your finished knot will look like, and if your knot can be done with straight line crossings, as mine does. For further
information on creation of Celtic Knots, see the links listing at the bottom
of this page. |

|
| 1.
LINES. Open a new file and then click the new layer icon (right beside the trash can in the layers palette). In this layer, make some lines that all go the same direction. For these 45 degree lines I used the line tool with a width of 20. *
Holding the shift key while you drag makes the line go at exactly 45 degrees. You can either eyeball the distances (I did) or you can use guidelines if you want to to make it very precise. Note: if you want to use a patterned line or shade it or something, dress it up in this step. Just make ONE line and then copy it.
|
|
| *In version 6, the line tool is under the rectangle tool. In options, choose the thickness that you want your line, and then click on the Create a new shape layer box which is highlighted here in orange: The "create a filled layer" option is useful if you want to be able to manipulate your line's shape after you have made it. (You do that with the pen tools using methods that I go through in my heart and raindrop tutorials.) If you use the "create a filled layer" option, you will need to rasterize your layer before proceeding. You do this with Layer -> Rasterize -> Shape.
|
MORE ON THIS: In the "create a filled layer" option, Version 6 makes lines (and rectangles and all the shapes under that tool) in VECTOR format. This means that they are defined as manipulable mathematical objects. (A line that starts at a certain percentage of the distance from the center of the canvas and goes at a 45 degree angle, etc.) In order to do the next steps, the layer containing this mathematical object must be a pixel-based layer. Converting mathematical objects to pixels is called RASTERIZING the layer. It is the same operation basically that you do to render a text layer. (You did that in 5.5 with text.) |
| 2. MORE
LINES. Open a NEW layer
and make lines on it that go the other direction. (Important to use a
new layer.)
|
|
|
|
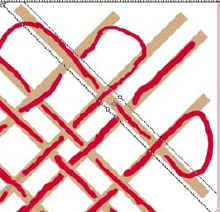
3. LAY OUT PATH. Make a new layer and in an obnoxious color, trace out where you want your knot to go and cross, etc. There are endless variations to this. Trial and error will get you to one that you like. It is my opinion that if it is symmetrical it will look better. |
| 4. WEAVING. This only SOUNDS hard; you have set this up so that you will get a nice effect quite easily. Make a rectangular marquis that is just a wee bit wider than your original lines. Choose Select -> transform selection and then hold shift key while you rotate the selection marquis to a 45 degree angle. With the marquee tool still selected, click inside the selected area and move the selection so that it is over one of your diagonal lines as shown. |
|
|
|
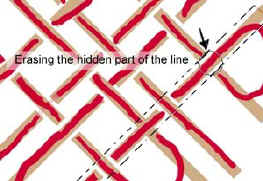
5. Now in the layers palette, click on the layer for the lines that go in the OPPOSITE direction from the marquis that you just made. You are going to erase the parts of these lines that go UNDER the selected line. (The line that appears to be selected, that is. You are on the other layer, though.) Erase with the eraser tool. You don't have to be overly careful because of the nifty selection you made and because the lines are on separate layers! If you have version 6 and this erasing is not working and it tells you you have to rasterize the layer, do it! :) Click on one of the line layers in the layers palette and then at the top of the program window, click on Layer -> Rasterize -> Shape. Then repeat with the other line layer. Then proceed.
|
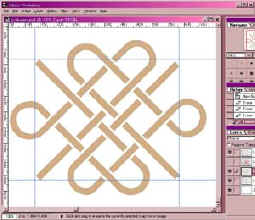
| 6. CURVES. Next, on a
new layer, do the curves around the outside. If these are parts of circles,
as I decided mine were, you can put a circle at one joint where you want
one and then cut out the center of it before copying it around to the
other joints.
Here is how i did the circles in PS v. 5.5:
|
|
In
v. 6 you can do it as above, or you can use the new vector shape
capabilities of v. 6. If you have v. 6, do this because it is a good
exercise:
|
|
Notice that, in v. 6, you can move the ellipse around and even reshape it after you have subtracted it from the center circle. That is because you are defining the ellipse as a mathematical object. This is one of the powers of vectors! (For more on reshaping paths, see my tutorial Raindrops.) In v. 6, once you are done with your circle, click on layer -> rasterize -> shape so that you can erase parts of the circles and combine the circles with the rest of your knot in the next step. Rasterizing converts the mathematical object you made (the path) into pixels. After you rasterize, you will not be able to adjust the paths anymore.
|
|
|
|
7. TOUCH UP. Adjust the curves by erasing on appropriate layers. Once you are satisfied with this, flatten the image. One note at this point: Since this is a geometrical design, the benefits of precision could be argued. I like to even things up under magnification and use guidelines to make sure things are pretty symmetrical. |
| 8. FINISHING. Now you can color
it or texturize it or use layer effects, whatever.
I got the cool shiny gold texture here by following these steps: a. I highlighted the tan part (contiguous option off ;)) and then went to the channels palette. I opened a new channel by clicking the new layer icon at the bottom and filled the highlighted area with white. b. Then I dragged the channel from the list to the new channel icon, duplicating this channel. I deselected, then Gaussian blurred the 2nd alpha channel. I Ctrl-clicked the original alpha channel and then select -> inverse -> delete. c. I returned to layers, selecting the layer where my knot is. I went to Filter -> Render -> Lighting effects and then under texture, chose Alpha 2. I found an effect that I liked and then hit ok. d. Finally I returned to channels and ctrl-clicked the first alpha channel, select inverse, and delete. e. I liked the layer effect "pillow emboss" for this. I hope you enjoyed this tutorial!
|
|
Ask tutorial questions in the Message Board or feel free to email me!
|
|