|
Turn the Page |
This effect has been used a lot, it's true, but it is still a cool one. Moreover, it gives me a good vehicle to teach you some good problem-solving techniques for Photoshop.
I would not classify this as a "beginners' tutorial," but if you are determined and patient, you can do this, even if you do not have much experience with Photoshop.
As we work through this tutorial, we'll cover some important Photoshop concepts. These include
- working with layers
- using the pen tool
- making a selection from a path
- adding to and subtracting from selections
- using gradients to shade
- using the paintbrush to shade
|

The screenshots for this tutorial were done with Photoshop 7, but you will be able to do it with any version which uses layers.
If you are using Photoshop Elements, you will be able to accomplish a page curl effect just fine, but you will not be able to use my path method of defining the areas. If you are pretty savvy with Elements, though, go on and have a read here. You will probably be able to figure out a way to do this on your own.
|
| There are lots of tutorials for doing "page curl" effects. You can even get a plugin to do this for you. So why would you want to learn "my way" of doing this?
Well... because this method can give you much more realistic results than the plugins and lots of other methods. And also, in this tutorial, we'll be working with some of Photoshop's drawing tools, which will leave you a little more able to figure out this kinda thing on your own!
|
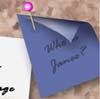 |
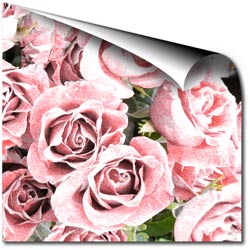
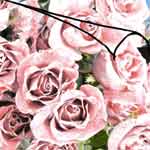
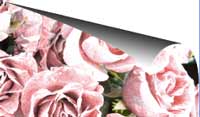
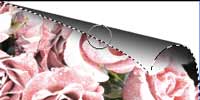
| The page curl illusion is drawn on a layer above the image layer. Then we will trim away the part of the image layer which is curled over. Hard to just explain it. Let's get into it: 1. Drag your image onto a new file. Either that or double-click it, so that it forms its own layer. This works best, though, if your image is a bit smaller than your canvas. In my example, the "page layer" is the rose paper.
2. Duplicate the page layer. We will be erasing part of the image, and if we end up erasing too much, having the duplicate of the layer will be handy. Turn off the visibility eye of the lower copy of the page layer. Your Layers palette should look something like mine. -->
|
 |
| 3. Make a new layer, and with black and a paintbrush, roughly sketch how the page curl will go. This is just a guide.This step may seem goofy, but you really need to plan what you are going to do. You can curl any corner or side of the image using this method. You just have to know your goal. |
 |
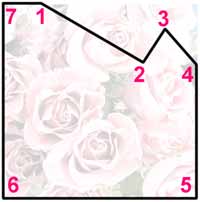
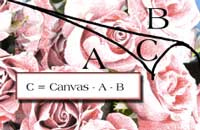
| Have a look at this diagram to the right which shows my goals for this page curl illusion.
If you look closely at the finished project at the top of the page, you will see that all we have done to the image to get this illusion is to trim off part of the the rose paper (the page), and then add a gradient and some shading.
The important part of this project, though, is defining the areas where we are doing this gradient and the shading.
|
 |
| Brace yourself. We are going to do the next part using the PEN tool. I suppose there are other ways to do this, but there aren't any that will give you this nice, smooth, and realistic curve so quickly.
For those of you who are new to the pen, or who are uncomfortable with the pen, follow these first steps carefully. This should get you feeling MUCH more comfortable with the pen. I think that i did a good job of explaining this. <strutting>
|
Confidential to Elements-Users:
If you are working with PS Elements, you don't have the pen tool, so you will have to find another way to draw this outline.
Have a look at the magenta shape just below. Using selections, shapes, or just painting, create that shape on another layer above your image layer, and I'll meet you down in step 5.
|
| 4. We'll now shape the page under the flap. This is the magenta part in the image to the right: |

|
|
a. Choose the Pen tool. This is NOT the "Freeform Pen," but the plain old pen, the first one in the list under the pentool, in the flyout.
b. Click the pen at the points where you want anchors, to make this shape. For mine to the right, I used exactly 7 anchors. Do NOT strive to get yours exactly in the same place as mine! Pages don't always curl uniformly. ;)
Once you have made points 5, 6, and 7, click again at 1 to close the path.
|
 |
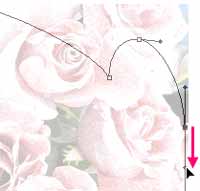
| Now you need to make these straight segments between #1 and #4 into gentle curves.
c. From the flyout under the pentool, (see right) choose the Convert Point tool. Working first on anchor point 3 from my diagram above, click-drag to the right, using the Convert Point tool. (or in the direction that you were going when you placed these points. I placed mine in the order of my numbers.) This should make this sharp point at #3 into a nice gentle curl.
|
 |
TIP: Holding Shift whilst dragging constrains the drag to 45° angles, making it easier to keep the drag perfectly horizontal or vertical.
|
|
d. Similarly, click-drag the convert point tool on #1. Again, drag to the right. You will have more realism here, probably, if your curve at #1 is tangent to the top edge of the paper. To accomplish this, drag horizontally.
What happens if you drag left? Down? Up? You can try all of these, by just click-dragging the Convert Point tool. Then when you are ready to return to the project, click-drag it again, this time, the way you want it.
|
 |
|
You can't hurt anything with the Convert Point tool. The thing to remember, though, is that it works as a toggle. Once you convert the point to a curve, with your click-drag, it will stay a gentle curve.... UNLESS you again click on it or its handles with the Convert Point tool. Clicking it again reverts your point to a corner point.
|
|
|
e. Using the Convert Point tool, click-drag #4 so that the curve is tangent to the edge of the paper. Since this is a vertical edge on mine, I'll be dragging my handle perfectly vertically.
|
 |
| f. For point #2, you want the segments coming from it to come out curved, but not in the same way. To see what i mean, using the Convert Point tool, click-drag anchor point #2. |
 |
|
You want the curves from #2 to operate independently of each other. Convert Point tool to the rescue again!
g. Click-drag the Convert Point tool on one of the handles of #2, as i show to the right, pulling it up. This part of the curve will stay tangent to that handle.
8. Do the same with the other handle for #2, bringing that other handle up.
|
 |
|
h. Should you need to make any adjustments on the curves that are already made, you can do this with the Direct Selection arrow. While you are working in the Pen tools, the Direct Selection arrow is just a Ctrl key away!
Using the Direct Selection Arrow, you can move the handles to reshape the curve, or even move an anchor point. Try it!
|
 |
|
Now let's fill in the path we just made. This will become the shape of the A region in the graphic to the right.
|
 |
|
i. Make a new layer in the Layers palette. Then go to the Paths palette and click the "fill path" button to fill it with whatever color is handy. There's A.
Note: If your Fill Path icon is grayed out, click the path in the Paths Palette to make it active.
Double-click this layer's name in the Layers palette and rename the layer A.
|
 |
|
|
5. We can now use the outline of A to get B and C.
B is the part that you will be cutting away from the page layer. It is what is left on the canvas after you take away A and C.
|
|
| So how do we get a selection of B? Well, there are probably several ways, but here's how I did it. I thought of B as the page layer, less A and C: a. Ctrl-click the page layer to load it as a selection.
b. Hold the Alt key. This means that whatever you select next will be subtracted from the selection you have. Ctrl-click the layer which you have named A. This subtracts A from the selection of the page layer (the rose paper).
|
 |
|
|
|
Now you have to subtract out that part at C. From point 1 to point 3, though, is just a straight line! This will make it easier to select out the section at C.
c. Holding the Alt key to continue SUBTRACTING from the selection, use the Polygonal lasso tool to make a segment from about point 1 to point 3 ...
|
 |
| ... and then somewhere down in A so that C is completely subtracted. Double-click the polygonal lasso to let it finish its selection.
You should have just the part at B selected now.
|
 |
| d. Click on your page layer and hit the Delete key. This trims B away. |
 |
| 6. Now we need to do the flap, C. C is what is left of the page minus A.
a. Ctrl-click the trimmed page layer to load it as a selection.
b. Alt-Ctrl-click the layer where you filled A, to subtract that.
|
 |
|
C should be all that's left in the selection! Next we will do a gradient to fill this flap C.
|
 |
Have several pages to curl?
You can use the piece you made for A for a template to curl pages in the future. Once you get the path made, go to Edit > Define Custom Shape.
Now, whenever you need a page-curl effect, you can drag this out over your page to get the basic shape. You still have to cut out B and make the selection of C as above, but I think you'll agree that shaping A is the hard part!
|
 |
|
| 7. Make the flap. You will do this by painting a gradient on a new layer:
a. Make a new layer and type D then X. This makes your foreground and background colors the Defaults and then eXchanges them, so that you have white on black.
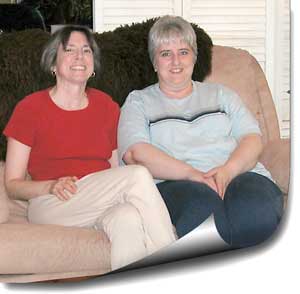
b. Choose the Gradient tool and, in the options bar, select either a linear or reflected gradient. (For my Roses example, i used a linear gradient. Below, for the pic of the two lovely women, i used a reflected gradient.)
Be sure that you have the Foreground > Background gradient active in the gradient editor box.
|
 |
|
c. Drag the gradient from the bottom or middle of the flap up, probably at an angle roughly perpendicular to the top edge of the curl. You will probably have to do this and undo it a few times before you get the result you want. If you want the top edge not quite as dark, you can end the gradient above the selection.
|
 |
| 8. Make the shading under the flap (on A): a. Make a new layer.
b. Ctrl-click the A layer to load it as a selection. Choose a wide soft brush with black as your foreground color.
c. Paint a continuous strip that seems to be under the flap. Because the brush is soft, it will blur out from under the flap a bit. This will give you the effect you want.
|
 |
| d. Paint a little more, if you want. Adjust the opacity of this layer, as appropriate.
9. Add a drop shadow to the page layer if you want, to give it more realism.
10. A teensy bit of shadow above the flap may look good. To get this, first make a selection of the B area again. With the magic wand set to Use All Layers, hit the canvas with the magic wand, outside of the area of the page and the flap. On another layer, paint a shadow, using a soft wide brush and a soft touch. Reduce opacity as before.
|
|
|
|
|
|
This method can be used for making lots of kinds of curled surfaces. With some practice to train your eye, you can even use these methods to make scrolls like mine to the right.
I hope you enjoyed this tutorial!

|

|