Fading Images Together Fading Images Together
with PS Elements 2! (This also works with full-version Photoshop!)
If you want to fade two images together, you will hear lots about a "Layer Mask," especially if you hang around with people who use full-version Photoshop. But then you look at the Layers palette in Elements, and there is no such thing as a Layer Mask. So then.. how do you fade images together? You know from talking to your PS buddies (or from some of my other tutorials, that you get the most flexibility if you use a mask. Well, are you out of luck? NO!
Photoshop Elements DOES have a sort of Layer mask -- and I named it an Elemask! Here's how it works:
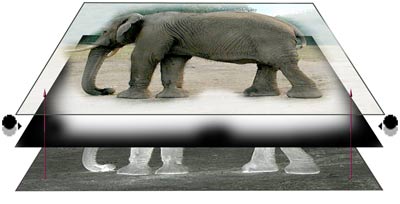
- Your bottom layer is the backdrop. This is the layer with the effect, vignette backing, or the 2nd image you want to fade into the first. The top layer is your working layer.
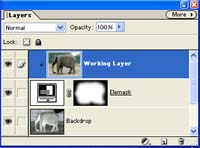
- With the bottom layer active in the Layers palette, click the Create a New Adjustment Layer icon at the bottom of that palette.
|
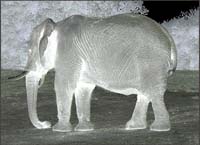
In this example, we started with the elephant and his inverted image.
|
- Choose anything there at random and click ok. The Adjustment layer is not what you need here. What you do need is that Elemask that comes with it! This is the white square on the right side of that adjustment layer in the Layers palette.
- To use the Elemask, you clip the top layer to it. To do that, hold your cursor right between the layers on the layers palette, hold the Alt key, and when you see the little clipping arrow
 , click. , click.
|
 |
- Now your Elemask is built. To use it, click that Elemask, the white part, in the Layers palette. Then choose a painting tool and paint in black everything that you want to HIDE from the top layer.
|
|
- The places you paint black on the elemask will show through from the bottom.
|
You can use any painting tool you want! Try it with a gradient, filling a selection, or using a funky brush at 50% opacity. Experiment with using filters to make cool edge effects..
|
|
|
|
And now, with your Elemask, you can do any of my tutorials that call for "Click the Add Layer Mask button at the bottom of the Layers Palette. You just do the 2 extra steps. Adjustment Layer.. Click OK... Clip. Well, i guess that's 3. :)
I hope you enjoyed this tutorial!

|
|
|
|
RETURN to Janee's Tutorial Index
Ask tutorial questions in the Message Board:

|
|
|
| All material in this site is ©2001-2002 by myJanee.com Graphic Creations. No part of it may be used without my written permission. If you have questions or comments about this site or its construction, contact Janee at myJanee.com Graphic Creations, 7193 W Gifford Rd, Bloomington, Indiana, USA 47403 or by email. |
|
|
|
|