Using Filters in Photoshop Using Filters in Photoshop
|
|
| It would be impossible for me to list or give examples for all of the things that you can do with filters and combinations of filters in Photoshop, so i won't even try. What I will try to do, however, is to give you some tips along these lines:
This tutorial will work equally well with Photoshop (any version) or Elements 2. If you are working with something other than PS 7, your screenshots may vary slightly.
Though I have written with beginners in mind, I will try to put something in that you have never seen, no matter how experienced you are!
|
Non-destructive Filtering
Huh? Can filtering be ... destructive? Yes, it can!
Destructive editing is that which changes your image's original pixels. For example, using an adjustment layer to do a desaturation is a non-destructive edit, whilst doing a desaturation with a menu command is a destructive edit. I've made a table at the right, which I hope gives you a more complete picture of what I'm saying.
So since filtering the image is destructive, altering forever its pixels, your goal should be, whenever possible, to use filters on either a copy of the image, a copy of the layer, or a Merged Visibles layer. This copy of the image which you use for filtering can then become a Filter Layer:
Image > Duplicate.
Drag the image layer to the Create a New Layer icon to duplicate it.
|
|
Destructive
|
Non-Destructive
|
| Making an adjustment through a menu command |
Adding an Adjustment Layer |
| Erasing part of a layer |
Using a layer mask |
| Painting on your image |
Painting on another layer over your image |
| Cloning on your image |
"Use all layers" clone on a new layer |
| Using Dodge, Burn, Sponge, Healing Tool, or Patch on the image |
Using one of these tools on a Merged Visibles layer |
| Filtering your image |
Filtering a duplicated layer of your image (a filter layer) |
| Flattening your image |
Making a Merged Visibles layer |
|
- OR make a Merged Visibles Layer:
This is what you should do if your image consists of several layers which you do not want to flatten. This is a new layer which gives you a flattened snapshot of all of the visible layers... without changing your other layers.
- Make a new layer above all the others.
- Turn off visibility eyes for unneeded layers.
- Ctrl-Alt-Shift-E.
|
 |
|
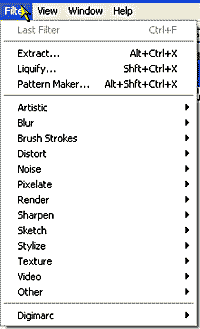
My Filter Classifications
These are my classifications of filters according to how I most frequently use them.
|
- Utility Filters: These are the ones that you use mainly to just get your picture looking ok.
- Artistic Touches
- Cool Stuff: Includes some that are artistic, some that are useful for various effects, and are neato-keen things to play with.
- Special Filters: These leave me wondering, "Why do they call them filters?"

|
Utility Filters
These are the ones that you use mainly to just get your picture looking ok. Though you can use these for creative purposes, essentially, these are just some of the workhorses of Photoshop:
|
 |
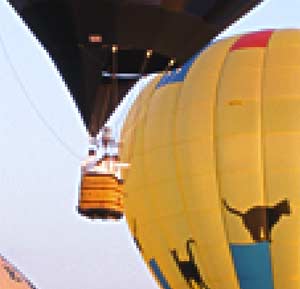
Sharpening Tips:
- Always view your image at full-size when sharpening.
- Sharpen last.
- Don't use "Sharpen" or "Sharpen more." The one you want is Filter > Sharpen > Unsharp Mask. I know it sounds dumb, but go with it. It won't UNsharpen; it'll sharpen, and give you the most control over the results.
- Avoid oversharpening. More than 2 pixels on a 300 dpi document is usually too much.
- When sharpening a pic of a person, it is usually best to sharpen the person's face using a threshold of about 5. This tends to be more flattering than that harsh sharpening, and she will be more likely to let you live.
- Higher threshold means that pixels have to be further apart in colour to be perceived as different.
- If there is some magic formula to sharpening, i've yet to discover it. Play around with the settings on your particular image. Depending upon what sort of image and what sort of lighting, you will learn what your favourite settings are. I usually like 60%, 2 pixels, threshold 0 for this kind of pic.
|

Unsharpened
|
56%, 1 pixel, threshold 0 |
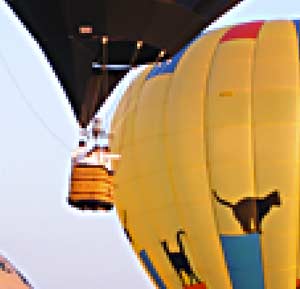
70%, 2 pixels, threshold 3
|
100%, 1 pixel, threshold 0 |
Blurs
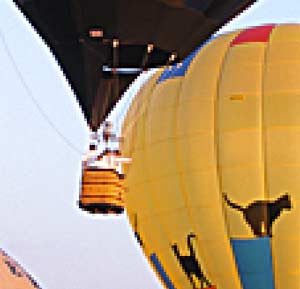
I sometimes will use a Gaussian blur to create a depth-of-field illusion in a photo.
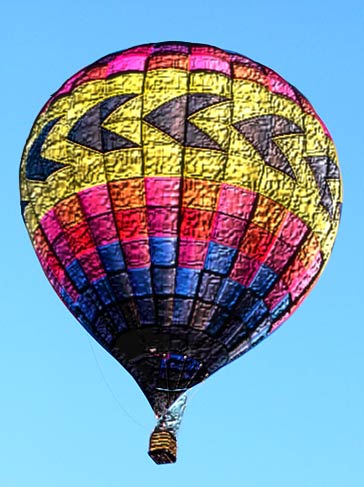
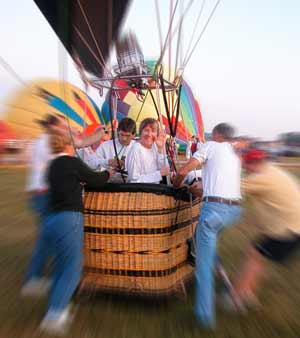
To the right, I've used a Radial Blur (Zoom) to make a feeling of motion and excitement. See the Layers palette below for how i did this.
- Duplicate the photo layer and apply the blur to the top one.
- Click the Add Layer Mask button (bottom of palette).
- For parts you do not want blurred, paint black on the mask, using a large soft brush. This hides that part of the blurred layer.
|
 |
Noise
When I'm doing a digital painting, noise is useful for making that "dusty" look of reality. Of course, you will want it to be subtle enough that it doesn't look filtered.
Dust & Scratches
Actually this filter doesn't MAKE dust & scratches, but it attempts to remove them. For areas with not much detail, you can have some success in removing dust/scratches by first selecting the area and then applying this filter.
|
 |
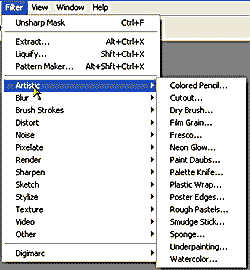
Artistic Touches
- Artistic
- Brush Strokes
- Sketch
- Render > Lighting Effects
- Stylize
- Texture
- Other > Maximum, Minimum
|
 |
|
|
Tips for success with the artistic touch filters.
This group includes not just the "Artistic" filters, as PS describes, but others which leave you with artistic effects.
There is much to like about Photoshop's more artistic filters. Done right, you can end up with some very nice effects. Photos can be made to look like oils, watercolors, charcoals, pastels, line drawings... neon... and more. Really, when you start combining these filters, the sky isn't even the limit!
Be sure, before you start filtering, that you have taken out anything that doesn't contribute to your painting. If there is something in the photo that you would NOT paint if you were sitting with an easel and brushes, then clone it out, crop it out, or paint over it (on another layer) before you get started with your filtering.
The key to using these "right," is to use them in such a way that no one can tell just what you did! If you are striving for a watercolor effect, for example, you do not want people to look at your work and say, "That's the watercolor filter." No, you want them to look closely and say, "How long do you let your watercolor dry before you scan it?" In other words, "Is it digital?" shouldn't enter their minds, if you have done your job well.
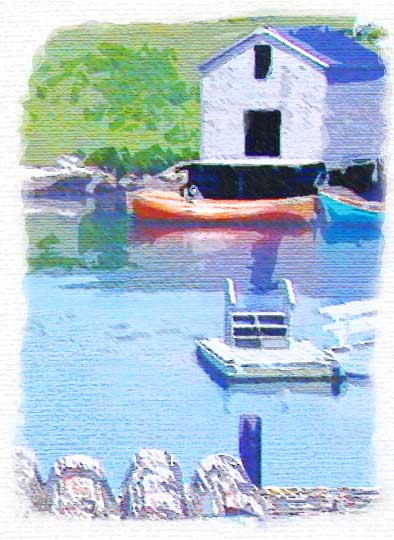
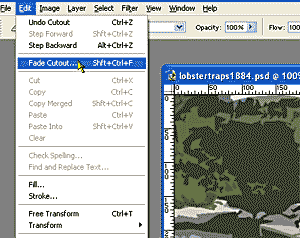
Don't be afraid to use some hand work. That's NOT cheating! ;) Something like adding a mask and making a watercolor edge as I demonstrate HERE, (and as i have used on "Lobster Traps" to the right) can go a long way toward making your viewer believe that this is a real watercolor.
|

Please click me!
|
Don't throw away that bad photo!
Even if your photo isn't up to your regular standards, you may be able to do something cool and artistic with it, expecially if the composition, colours, or subject matter are particularly appealing. Poorly focused shots can make great paintings. Photos that are taken at low resolution and enlarged, can often have enough detail left to make a filtered effect work well.
|
Combine Filters
Definitely combine your filters! This goes right along with what i said about keeping the people guessing about what you've done to your image. The more filters you can use on your image, ... well, up to a point.... the less likely people will be able to tell what you did... and the more likely you are to be able to come up with an image effect that is uniquely your own!
There are a several ways to combine filtered effects. The first is to duplicate your image layer (always!), filter it.... filter it... filter it. Refiltering a filtered layer is is a perfectly fine way to combine filtering effects.
However, there is a much more flexible way to combine filtered effects. This will enable you to come up with some great effects, and some surprising results, which may help you later in other projects. I call it using Filter Layers.
|
 |
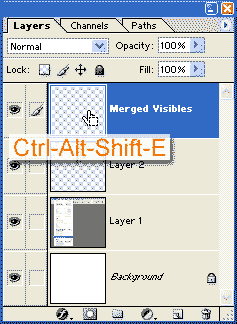
Tips for using Filter Layers
- Begin by making a Merged Visibles layer above all of your work to this point. This is a way of making a flattened copy of all you see.
- Make a new layer.
- Ctrl-Alt-Shift-E
- Label the Merged Visibles Layer by double-clicking its name in the Layers palette.
- Duplicate this Merged Visibles Layer several times. The goal is to keep one Merged Visibles Layer unfiltered, so only use filters on the ones that say "copy" in the name. Turn off all of the visibility eyes except the bottom Merged Visibles Layer (the original) and the one right above it, which will become the first filter layer.
|
 |
- Apply a filter to this first filter layer. If it's too pronounced, you can either use Fade (Edit > Fade) or you can just reduce that layer's opacity. You can also change the layer's blending mode, which marries the effect you just made with the layers below it (the Merged Visibles Layer.)
- Once you get this layer as you like it, label it with what you've done to it. I like to put in the settings for the filter, if they are important to the result.
- If you don't remember your settings (and who does?) use Alt-Ctrl-F. This will bring back your last filter's dialog box. Remember those numbers and then click Cancel.
- If you want to add another filter effect, drag the next Merged Visibles copy up to the top of the stack. Apply your filter and then use opacity or a blending mode to marry this with the effect you got before.
- Repeat ad infinitum, but not ad nauseam. Enough is enough!
|
 |
Recording what you've done
Have you ever been playing around with filters and come up with a very nice effect... only to realize that you have NO idea how you did it? Happens all the time! There are a few ways to remember what you've done.
- Make an Action as you fiddle. This presumes that you think you are going to do something worth repeating, but it will preserve your steps and settings. I never do this.
- Make a Photoshop Sticky Note and attach it to your PSD file. (I very rarely use this, just because i'm not used to it, but it is kinda a cool feature.)
- Choose the
 Notes tool in your toolbar and tap it on your document. Notes tool in your toolbar and tap it on your document.
- Click the little square in the upper right corner of the note to minimize it.
- It will show as a little gray square in the doc and you can double-click it to see it again.
- To hide the note so you don't see that annoying gray square, you can go to View > Show > and uncheck Annotations.
- Under the Notes tool is an Audio Annotation tool. Go on and try this. I'll wait here. <shudder>
|
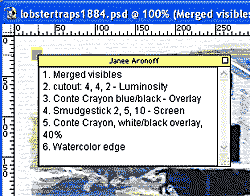 |
- Make a new layer and type out your directions there. This isn't quite as clean as the PS note tool, but i do use it more. I like that i can just make that layer invisible and then call it up again instantly.
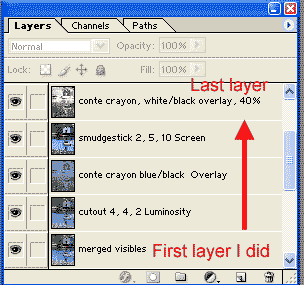
- Carefully label your layers. Ok.. in case you have not guessed, this is the method i use most for keeping track of what i've done. In my actual layers palette for "Lobster Traps," shown to the right, i did 5 layers. Each of these began as a copy of the Merged Visibles layer. (This was a snapshot of the original photo with all of its adjustment layers and other corrections.) All of these adjustment layers and such are still in the document below this Merged Visibles layer.
|
|
"Colored" filters
Some filters rely upon your choice of foreground-background color. Some of these are Colored Pencil, Clouds, Sketch filters (all but Water Paper -- go figure), Tiles (can use fore or background for "grout"), or Stained Glass (uses foreground for separators).
|
 |
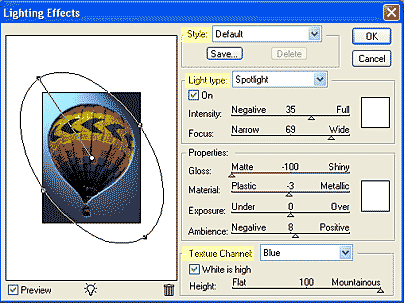
Lighting Effects
Though Lighting Effects can be used for Artistic Touches, for sure, I very nearly classified it under "Cool Stuff" just because of its high coolness factor.
People try to use the lighting effects filter for things it was not meant to do. Making rays of light which appear to shine through a forest foliage.... that is not a job for the Lighting Effects filter. Making a page look as if it has a spotlight shining on it, or making a raised effect... those are good jobs for lighting effects.
To make a 3D sort of effect on an image, you can use lighting effects. Here's one way:
- Filter > Render > Lighting Effects.
- Under Texture Channel, choose one of the color channels.
- Shine the light around by dragging it and its arc around.
- Experiment with the Intensity, Properties, and Height settings.
- Try other lights, even, under the Style dropdown.
- I have more on using Lighting Effects to make raised 3D text effects at my Antique Gold tutorial or my Hearts 3 tut.
|

Click me!
|
|
|
Cool stuff
These are filters which can really drastically alter your image. These are the real pixel-manglers.
- Distort
- Pixelate
- Some of the Render filters
- Stylize > Wind
- Blur > Motion or Radial
- Other > High Pass
|
 |
| I'm sure that you will come up with your own cool ways to use these. Here are some things that I do with them:
Distort makes good magnification illusions, like a surface viewed through a drop of water. See my tut for making the drops HERE.
Pixelate is a good beginning point for fingerpainting.
Filter > Render > Difference Clouds. Then repeat.. repeat... repeat... makes a neat marble texture. It can also be worked into lightning.
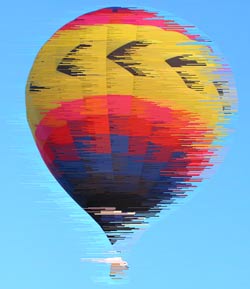
Blurs can be used for motion effects like a motorcycle speeding by or a skier. You see this a lot in advertising.
High Pass filter... i use this for my Line Drawing effect.
|
 |
Special filters
(so special that I wonder why they call them filters)
- Extract - I did a tutorial using this tool HERE.
- Liquify - This is good for ... um... well.. painting effects that are difficult to control and, therefore, suck. It is also good for mangling features of those you love. (see below.)
- Render > 3D Transform - This is a nice little filter for making labels on wine bottles, bending labels around boxes... that sort of thing. I'll be doing a tutorial on the use of this one "filter" eventually.
- Pattern Maker - This is quite fun. You can choose a part of your image and Photoshop will randomize it into a pattern. Then it will offset it however you like. This would make a good tutorial all by itself, as well, but it is fun just to muck around with.
- Video - I don't know anything about this.
- Digimarc - It is supposed to render your image not as good to copy by embedding a digital watermark into the image. It isn't supposed to affect image quality. Once you have paid the Digimarc subscription fee, if your image is seen on the web elsewhare, Digimarc notifies you.
- Other > Offset - This is good for making seamless tiles, as i did here and here.
|
 |
General Filtering Tips
- Ctrl-F will perform your last filtering operation exactly as you did it (same settings) on the current image.
- Alt-Ctrl-F will bring up the dialog box for the last filter used with the last settings visible for you.
- Be sure to look at your image in the same size you will be outputting. Sometimes your filtered image can look great at full size on your monitor, but when printed smaller, the details of your effects are lost!
|
Starting from Scratch
If you are doing art starting with a blank canvas, and you don't know what to do first, here's something to get you going:
- Fill your canvas with a color or gradient.
- Filter > Noise > Add Noise.
- There... now you can do all kinds of things!
|
Don't over-use filters
Photoshop's filters are wonderful and exciting, but can easily be overdone. If someone can look at your image and tell you exactly what you did to it, then you might be relying too much on filtering.
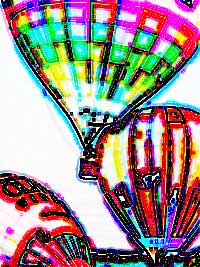
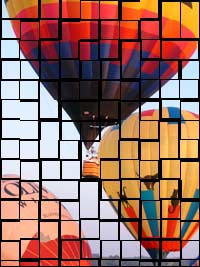
For example, most people who have spent more than a few days with Photoshop or Elements would be able to tell me that this image at the right was done with Filter > Stylize > Tiles. Just don't be too predictable!
Another caveat is to know when to stop. Sometimes a little of a painting effect can look great, but then you add just one more filter and it's clearly over-kill.
|
 |
A word about 3rd-party filters
I don't use any. However, this doesn't mean that they're bad. It just means that I have gotten along fine without them for years of doing everything i have ever wanted to do with Photoshop. Sure, I may take an extra step here and there. Sure, i may not come up with the exact effect that someone else does.
Does this mean that you don't need to spend extra money for add-on filter packages? You decide for yourself.
How do you get these into Photoshop? Some of them install themselves. Others you copy into the folder you specify in your Preferences. (Edit > Preferences > Plugins and Scratch Disk)
If you have problems with them, Adobe says to contact the manufacturer. I've heard that some filters will work fine with older versions of PS, but won't work with version 7.
So there you have it! Enough knowledge to be very dangerous!
|
| I hope you enjoyed this look at filters!

|
|
|
RETURN to Janee's Tutorial Index
email me!
Ask tutorial questions in the Message Board:

|

Sign my Guestbook!
|
| All material in this site is ©2001-2003 by myJanee.com Graphic Creations. No part of it may be used without my written permission. If you have questions or comments about this site or its construction, contact Janee at myJanee.com Graphic Creations, 7193 W Gifford Rd, Bloomington, Indiana, USA 47403 or by email. |
|
|
|
|