 |
Website Interface with Rollovers
Part 2: Making the Buttons
|
 |
|
| OK, we now have some sort of interface design, and we want to put buttons on it. Each of these buttons will eventually DO something when a viewer rolls their mouse over it, and will do something else when the user clicks it. At least, that's the goal.
There are lots of different things that you can have your buttons do -- move around, display a message, glow, pulsate, turn on part of a "machine," etc.. For this project, we'll make it so that the buttons glow on mouse-over, and so that they look pushed in when the user clicks on the button.
Maybe eventually I'll do a tutorial which shows how to make animated rollovers. Those are quite fun, too.
|
Tutorial Requirements
This is not a beginners' tutorial, but rather an intermediate one. (If you are "advanced," then you're writing your own tutorials. ;)) If you are a beginner, but need to learn to do rollovers in Photoshop, set aside a day or two to do nothing else but this. Stick with me here, and you can get this.
This part of the tutorial can be done in Photoshop version 5.5+ or in Elements. However, using the rollover states will require Elements users to find a different way to do this, since Elements doesn't have ImageReady.I wrote this tutorial using Photoshop CS. Parts of the tutorial won't make sense unless you have 7+, like the Layer Sets.
|
|
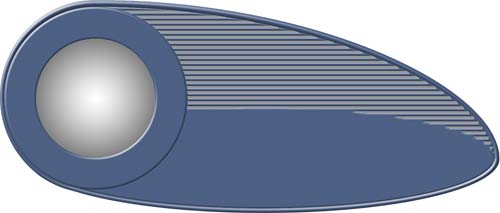
Here's where we left our super-hero. Looking fine, but with no buttons!
|
I've decided that I want to have round buttons around the circumference of the bezel. Placement is important, as I want them to be precisely aligned.
1. Place Guidelines.
Putting Guidelines on your image make it easier to get your buttons placed precisely.
Begin by clicking the Bezel layer to make it active. When that layer is active, your guides will snap to various locations on it, like the sides or the center. The center is what we need now. We also need the center of the top section, as marked to the right.
In PS, drag the guides from your rulers. (Don't see your rulers? View > Rulers!)
|
 |
2. Make the first button.
I also want the buttons to be changeable. That is, if my client decides that the colors need to be changed according to the season, I want this to be easily done.
Because we want the editability of the button colors, let's do this with a Shape Layer. Begin by setting the options in the Options Bar. Then we'll make one of the button shapes and copy it around for the other buttons.
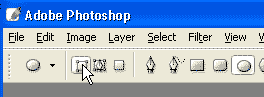
- Choose your Elliptical Shape tool.
- In the Options, choose Shape Layer.
- You can use any color, but one that contrasts a bit with your interface color would be best.
|
 |
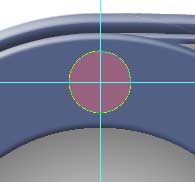
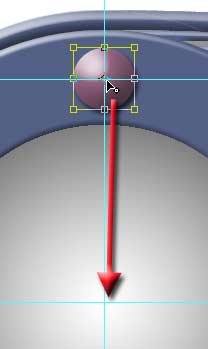
- Hold the Alt key and the Shift key, and drag your first circle out from the intersection of the top two guides.
What does it do to hold Shift?
What does it do to hold Alt?
Whew! I don't know if I can stand the beauty!
|
 |
3. Give it a Layer Style.
I'll add an Inner Bevel to mine, along with a 5-pixel Drop Shadow.
|
| TIP: In the Layer Style dialog box, click the words "Bevel and Emboss" in order to get to the attributes. |
|
|
|
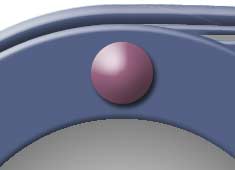
This looks good! Let's make more!
|
|
4. Duplicate this button.
Hey... if one's good, 6 will be terrific! Let's do it. We are going to do this in the mathematically precise way, in case you care. If you don't, go on and be sloppy. Just don't tell me about it.
- Click your button layer. Choose the Move tool. (Sometimes this doesn't work unless the Move tool is chosen.)
- Now do Ctrl-T. This will bring up your Transformation handles. We're going to do a rotation on this, but with a twist. Follow along.
- Click the center point indicator inside the Transformation box. Now DRAG it down to the center of your circle. This changes the center of your rotation.
|
 |
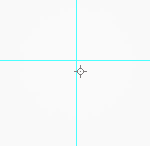
- We want this placement to be exact, though, so you need to zoom in on this center, to be sure that it is right ON the crossing of your guidelines. To zoom in, though, you have to use the keyboard shortcut for zooming, because choosing another tool will make your transformation cease.
The keyboard shortcut for zooming in is Ctrl-Spacebar. [Command-Space on a Mac] (Guess what the shortcut is for zooming out? Try it, after you have moved your center to where it needs to be.)
At the right, my center really did look like it was on the crossing of the Guidelines... that is, till I zoomed in!
|
 |
- Since we're making 6 buttons, we need to rotate this button around the center 1/6 of the degrees in a circle, or 60°. Type this number into the angle° box in your Transformation Options bar.
- Hit Enter twice. (Once tells PS that you're sure about the angle° you typed in. The second time tells PS that you are sure about your transformation.)
|
 |
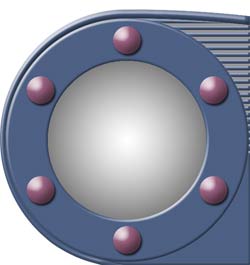
| Et voilà! The button is rotated.
Now... this next part is so cool I hope you can stand it. This process I'm about to show you is called "iterative transformation." If you don't believe me, do a Google search on it (leave the quotes in.).
|
 |
- Ctrl-Alt-Shift-T. Once - Twice - Thrice .... and till you have all your buttons! They should all be perfectly positioned around your bezel.
|
 |
| 5. Color the buttons.
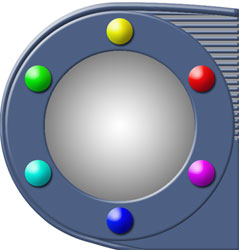
Because we have made the buttons with a shape layer, we can change their color quite easily. If we want all the buttons to be green, click the color swatch on the left side of the Buttons layer and pick your green.
But suppose we want all the buttons a different color? Let's group a new layer to this button layer and then we can go a little mad.
|
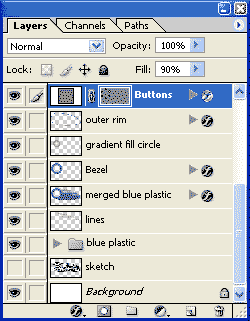 |
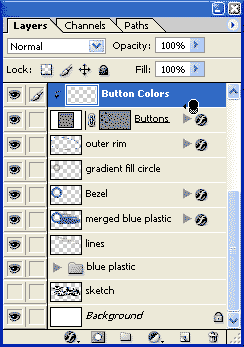
| Make a new layer above the Buttons Shape layer. Label this Button Colors.
Hover between these layers in your Layers palette and hold the Alt key. You will see the little grouping icon as I have to the right. Click. This groups your layers.
Now whatever you color on this layer will be contained within your buttons!
Now here's where Janee gets carried off in a wild fit of creativity!
|
 |
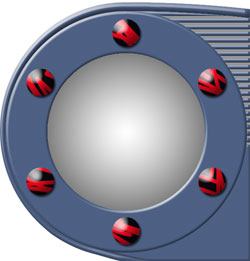
Fill this Button Colors layer with black and then scribble on some red.
|

Fill the Button Colors layer with dark blue. Filter > Noise > Add Noise. Filter > Sketch Reticulation (blue/white for fore/background colors) |
Fill the Button Colors layer with an Angle Rainbow Gradient and this is the result!
|

Make your buttons into semi-precious stones by putting your rainbow gradient in Difference mode and dragging it across the layer till you gasp. |
| Now YOU go a little mad! Whatever you do for your buttons, you're not allowed to make them just like mine.
Ok... here's just one more. This one uses the two just above, with the rainbow layer in Color Blending Mode. Looks like Cat's Eye to me!
|
 |
|
Make your way over to Part 3 where you can see which one I picked for mine... and we'll make the rollover states!
|
|
|
|


