|
Website Interface with Rollovers
Part 3: Making the Rollover States
|
 |
|
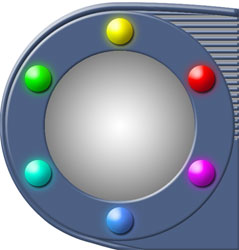
| Part 2 left us in a dither over which lovely effect we were going to use for the buttons. I've opted for the simple but whimsical rainbow treatment.
Ok, now we have these beeeeautiful buttons, but we wanna make them glow when we mouse over them (the "over" state) and look pressed when they are clicked (the "down" state). How do we do that? Let's go!
0. Simplify things a little.
This step is optional, but it explains my Layers palette's appearance in the next step. That group of layers which make up the interface itself can be neatly placed into a Layer Set to tidy things.
Link all of the interface layers. In the dropdown to the top right on the Layers palette, choose New Set from Linked. And there you are.
|
 |
1. Duplicate the Buttons layer.
Drag this Buttons layer to the New Layer icon TWICE. This will make two copies of the button layer.
Label one of these "down" and one of them "glow."
We will do the down state using Layer Styles, keeping our editability intact.
First, though, let's do the "over" state, the glow!
Turn off visibility for the down and buttons layers for now.
|
 |
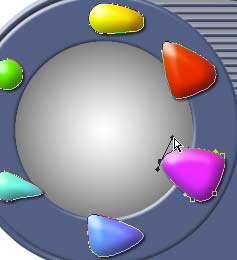
2. Rasterize the Vector Mask.
Yeah.. this does sound hairy and scary! So before we actually DO it, let's talk a bit about what we're doing.
See the mask which is mostly gray on your button layer? This was created when you made your Shape Layer, and so it is a Vector Mask. It is actually editable as a vector object.
Don't believe me? Try this digression below.
|
Digression: What does a Vector Mask do?
- Ctrl-S to save your file. Then go to Image > Duplicate. (This makes an exact copy of your PSD image in a NEW FILE.)
- Now click that Vector Mask for the Glow layer. Choose the Direct Selection (white) Arrow in the toolbar. Click it on one of the button paths. Drag some points and some Bezier handles. So this path is like a container which holds paint. And you can change the shape of it!
- Now close this file. No, you don't want to save it.
So what this Vector Mask does is to define this shape in a mathematical way. You didn't tell PS to make a circle filled with so many pixels. You told it to make a shape with these (editable) boundaries, filled with whatever is in the box to the left of the vector mask. The image isn't actually pixels till you "rasterize" it or save it as pixels (in JPG or GIF format).
For much more on the differences between vectors and raster images, see my What's the Vector, Victor? tutorial.
|
|
|
- Ok.. so to rasterize the Vector Mask, click the mask in the Layers palette. Then go to Layer > Rasterize > Vector Mask.
Your image will not look different, and your Layers palette doesn't change much. You will lose that little path line around your buttons, though. Why? Because there is no longer a path there.
You can no longer edit your buttons' shape as you did up in that Digression, but there ARE some edits you can do which you couldn't do with the Vector Mask.... like make this glow.
|
 |
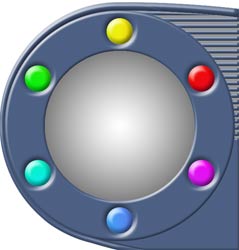
3. First, neaten things up again.
- The Glow doesn't need to have these bevels, so right-click this layer and choose "Clear Layer Style."
- You DO want the glow to be BENEATH the buttons, so drag this layer to beneath the Buttons layer.
- You DO want for the Glow and the Down states to each have the color associated with them, so duplicate that rainbow layer twice, and group one of these copies with the Glow layer, and the other with the Down layer.
- Turn OFF the visibility eye for the Down layers, and turn it ON for the glow and Buttons layers.
Your Layers palette should look something like mine.
|
 |
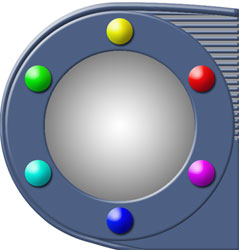
4. Make the Glow.
| NOTE: If you want to make a glow that's the same color under all of these buttons, or if your buttons are all on separate layers, you could do the glow with an Outer Glow Layer Style. Such is not the case here, so I'm gonna use the Brute Force Method. |
Click that now BLACK mask, which is now a regular Layer Mask, and then go to Filter > Blur > Gaussian Blur.
The amount of blur you give will depend upon the effect you want to present, and on the size and resolution of your image.
And there we are!
|
 |
5. Create the Down states.
When the button is pushed, we want it to LOOK like it has been pushed. We can do this with a Layer Style.
- Click the layer you've labeled "Down." Turn off the visibility for the Buttons layer and the Glow layer, so you are looking at your Down layer.
|
 |
- Click the little
 at the bottom of the Layers palette to bring up the Layer Styles dialog box. at the bottom of the Layers palette to bring up the Layer Styles dialog box.
|
| Your mileage may vary, depending upon the size and resolution of your buttons, but these are the settings that I used for my Down state buttons.
|
|
|
|
| There! Now you can click on and off the visibilty of your layers to see each of your 3 rollover states: Normal ("Buttons"), Glow, and Down. |
|
|
Now, sharpen your scaplel! Over in Part 4, we will slice the image!
|
|
|
|
|
|
RETURN to Janee's Tutorial Index
Ask tutorial questions in the myJanee.community:

|
|
|
| All material in this site is ©2001-2003 by myJanee.com Graphic Creations. No part of it may be used without my written permission. If you have questions or comments about this site or its construction, contact Janee at myJanee.com Graphic Creations, 7193 W Gifford Rd, Bloomington, Indiana, USA 47403 or by email. |
|
|
|
|