myJanee.com --> Photoshop Resources --> Janee's Archive Tutorials -> This tutorial
 Postcard Text 3: Postcard Text 3:
Using "Paste Into"
In this tutorial, we will use a Layer Clipping Group to make Postcard Text. This, as I explained in the first tutorial in this series, is text with pictures inside it, as you often see on postcards. Though this tutorial was written with beginners in mind, I learned a thing or two as I was putting it together. :)
As you make this "Postcard Text," you will pick up or practice some nifty Photoshop tidbits. Here are some:
- Using the Type tool.
- Using keyboard shortcuts.
- Selecting using the magic wand.
- Using "Paste Into."
- Resizing an object.
- Stroking a selection.
- Using Layer Effects.
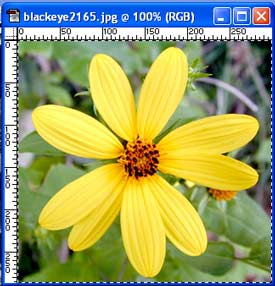
For this exercise, you will need filler photos for the text. I've used just two photos, but you can use as many as you like. You may want a background image as well. In the link here you can grab the flower photos that I have used for this tutorial. I have some others there too. :)
Janee's Flower Photos
(If you want to use my flower photos, you have permission to use them solely for the purpose of completion of this assignment, and if they are to be published in any form, they must be accompanied by my copyright ©2001, myJanee.com.)
|


Brute Force Method
This is fine for when you have just a quick job to do and don't remember how to do the other methods.

Clipping Group Method
This is probably best when you have ONE picture or composite to go behind a block of text.

Paste Into Method
This is the easiest way to handle pasting different pictures into different parts of the text.
This tutorial was written with screenshots from Photoshop Version 6.01. Everything here can be done with PS version 5 or with later versions of PS, though the screenshots may be slightly different.
|
| 1. File -> New. Make your canvas 700 pixels wide and 500 pixels high. If you are planning to print your image, make the dpi 300 or whatever your printer requires. If it is for the web, 72 dpi is fine.
2. Choose your Type tool and click on the "New Type Layer" button in the options bar.Type your text. Click the layer in the Layers Palette to commit your text. Change your font or your font size as you need to make a nice big bold text.
If you want your text to overlap as mine does below, do each letter on a separate layer and don't flatten. I actually drew mine using the pen tool. My aim is for kind of a 1965 flower-power look.
It is fine to have your text all on a single layer for this tutorial, but if you are making it all into one layer, don't make the letters overlap! However you do it, use a font that makes bold letters. For details on working with text, see this tutorial.
File -> Save As.. and pick a location and a descriptive name for your image. Save it in psd format. This preserves the layers and doesn't do any compression so you won't lose image data as you save and resave.
|
 |
|
|
| 3. Open your first filler image. Ctrl-a to select all (the whole canvas). Then hold Ctrl and type c. Release both keys. This copies the selection from that image into your clipboard.
Now we are going to paste this image into one of the letters, but you have to tell Photoshop where to paste it.
|
 |
| 4. Go back to your file with your text and click on your text layer in the layers palette to select it.
Choose your Magic Wand tool and, in your options, uncheck "use all layers" and be sure that "contiguous" is checked.
Then touch your magic wand to the letter where you want your filler image to be pasted.
If you are filling a 2-part letter like an "i," hold shift and then touch the magic wand to the other part of the i. Holding Shift adds to the selection.
|
 |
| 5. Edit -> Paste Into or Ctrl-Shift-V . This should put your image into the shape of the letter.
Look at your layers palette now. You see your filler image there and a mask has been made that allows only the letter part of the image to show. Ctrl-S to save.
|
 |
|
6. Now... one cool thing about this that we did NOT have with the Brute Force method of Postcard Text I, is that we can still edit the filler picture. If we don't like how it looks within the letter, we can still change it!
- Choose your move tool and drag it around on your canvas to see what happens to your filler image.
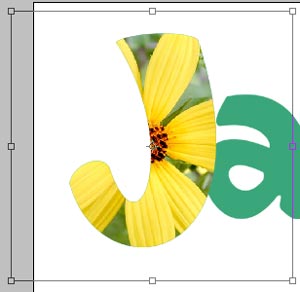
- Ctrl-t or Edit -> Transform to bring up your transformation bounding box. Resize your filler image to see how this works. If you like your change, click Enter to apply the transformation. (If your filler image is bigger than your canvas, you may have to drag your canvas borders wider till you can see your bounding box.)
- If you decide, when you still have your bounding box up, that you want to NOT do this transformation, click the Esc key. If you decide you don't want the transformation after you have clicked enter to apply the transformation, click Ctrl-z to undo or click to a previous stage in your History palette. Photoshop allows us many escape routes!
- In the screenshot to the right, I'm resizing the flower within the letter smaller so that more of the flower shows.
- Image -> Adjust -> Hue/Saturation and move your sliders around to recolor it. Click OK if you want to keep your new color or Cancel to go back.
Ctrl-S to save. Am I a stickler about saving? You bet, I am! If you get into the saving habit NOW, you will someday thank me for this. :)
|
 |
| 7. Click back on your type layer and then use your Magic Wand again to select another letter.
If you are using the same image as before, you don't have to Ctrl-A and Ctrl-C again, because it is still in the clipboard! Just Shift-Ctrl-V to paste it into the letter you have selected.
8. Repeat for any other letters you want filled with the same image. Ctrl-S to save.
9. Do the other letters with your other filler image(s) just as you did with the first one. Ctrl-s to save.
|
 |
 10. To make the black background, click on the background and, with black as your foreground color (Type D to restore your default colors.), alt-backspace to fill. 10. To make the black background, click on the background and, with black as your foreground color (Type D to restore your default colors.), alt-backspace to fill.
|
|
11. If you are doing this "Flower Power" look, you may want a funky border as i have made. I did this as follows:
- In the Layers Palette, ctrl-click the text layer. If your letters are all on separate layers as mine are, ctrl-click the first one, then hold shift and ctrl-click the others, one at a time.
- Click your background layer and then click the new layer icon at the bottom of the layers palette. This creates a new layer below all your other work but above your background. Alt-backspace to fill your text selection with black. Since it is under the filled letters so you won't see the black at all. This is a "dummy layer." which we will use to make a layer effect for the text layer. Ctrl-d to deselect.
- Click the little f in the black circle at the bottom of the Layers Palette to bring up Layer Effects. Choose Outer Glow. I used the settings here at the right. (I know that this image is a bit small but the exact numbers are not important.)
Ctrl-S to save.
12. If your letters are overlapping as mine are, you may want the black outlines between the letters. These were done as follows:
- I selected the letters as we did above.
- Then I made a new layer and dragged it above the flower layers in the layers palette.
- I then used Edit-> Stroke .. using black for the color.. and 4 pixels in width. I used the setting "center."
Ctrl-S to save.
At this point, you may wish to save this to send to someone in email, just to show everyone how cool you can be, or you may want to post it to your Webshots album. You can do this with File -> Save for Web. For more details on this feature and step-by-step tutorial on this, see my Save for Web tutorial. Or click here for more on general saving.
|
 |
I hope you enjoyed this tutorial on using Paste Into to make Postcard Text, and that, along the way, you learned something, too!
Always me,

|
| For more postcard text, see these other 2 tutorials:
 Postcard Text 1: Flowers -- Janee's Brute Force Method Postcard Text 1: Flowers -- Janee's Brute Force Method
 Postcard Text 2: Using a Layer Clipping Group Postcard Text 2: Using a Layer Clipping Group
|
|