Love your Pen 1: Love your Pen 1:
Working with the Freeform Pen |
This tutorial is for you if you have Photoshop and want to get a bit more familiar with the wonders of the Pen tools.
I wrote this with Photoshop 7, but it will work with other versions. It will not work with PS Elements, since Elements doesn't have a pentool.
|
|
I have an amazing new Finally Mastering the Pen Tools tutorial! All new for CC2020!
In this tutorial, I'll show you how to use the pentool to reproduce some handwriting. This can be useful if your handwriting isn't as neat as you want it to be, you can't write well with a mouse, (who can?) or if you are trying to copy someone else's writing. As you work through this, you will learn
|
| If you have taken any of my other tutorials before this one, you know that I nearly always start you out by creating a new layer.
Well, this tutorial is different. We don't NEED a new layer yet, because, though you will be able to see it in Photoshop, the path we are to make is not pixels. It is just a plan for where the pixels will be, when we decide to fill or stroke the path with pixels.
Choose your Freeform Pen from the toolbox, and be sure that the Paths option  is selected in the Options bar. Make sure, too, that Magnetic is UNchecked in the options. That would mess you up in a big way for this exercise. is selected in the Options bar. Make sure, too, that Magnetic is UNchecked in the options. That would mess you up in a big way for this exercise.
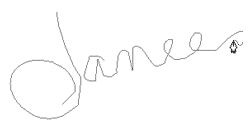
Sign your name, just as you want it. It will likely turn out jaggy, as mine did. We will fix that next!
|
 |
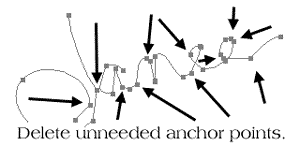
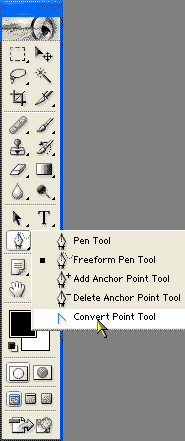
| 3. Hold the Ctrl key and your pen will turn into the Direct Selection Arrow. Click this tool on your path, to make the Anchor Points visible.
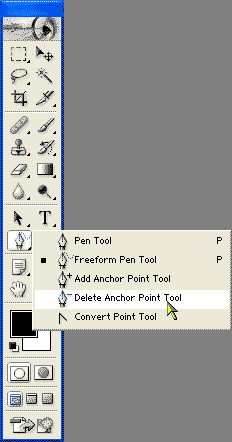
Pick the Delete Anchor Point tool from under the pen tool. Now click that on any unneeded anchor points. The fewer anchor points you have, the smoother the curve will be.
If your path goes nutty, you may have deleted an anchor that you really do need. If you do that, Ctrl-Z to bring it back. (Alt-Ctrl-Z for multiple undoes)
|
 |
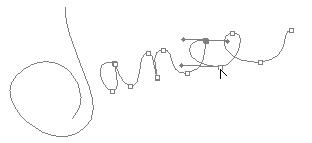
| 3. Smooth out the curve by using the Convert Point tool, another of the pen tools. To use it, click-drag on a point. This will bring out the handles which you use to adjust the curvature of the line at that point.
|
 |
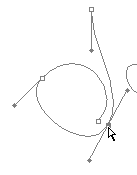
4. You can return to adjust it further, without converting it to an angular point again, by holding the Ctrl key. This changes your Convert Point tool into the direct selection arrow. With this, you can pull on handles to adjust anchor point locations or pull on the points themselves to move them.
Play around with this until you get your signature looking good.
The Pen tool is really a great tool and can make an artist out of you, even if you, like me, can't draw a smooth curve at all! For more details on use of the freeform pen tool, see my Heart Tutorials.
|
 |
5. Now to make this path into someting real, you will convert it to a brush stoke. To do this, you have to tell Photoshop 4 things:
- which path (or part of the path) to stroke
So let's make sure that we have made our wishes clear to Photoshop:
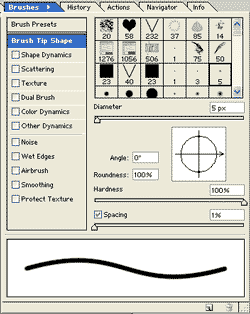
- First, the brush: Type B to bring up your Brush tool. In the Brushes palette, check to make sure that you have the proper brush size and options chosen. For a plain business-like signature, you will probably want a hard round brush with spacing close, like 1%. You can stroke this path with ANY kind of brush, though, for some cool effects.
- Your foreground color should still be black.
- Make a new layer, if you have not done so already, by clicking the Create a New Layer icon at the bottom of your layers palette.
|
|
For more on using different brushes with paths, check out these tuts:
|
- All you have to do now is to tell PS which path or part of the path you want to stroke. PS identifies a selected path by displaying it as a thin line. Your anchor points may be showing too.
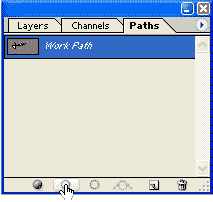
But if your path is not already chosen, click the Paths palette tab and then the path you just made in the list. Click the path and you will see the thin line of the path once again, showing you that the path is active.
6. Stroke the path by clicking the Stroke Path icon at the bottom of the Paths palette.
When you are finished with the path, clear it by clicking in that empty space below it in the Paths palette.
|
 |
Tip: If you just want part of the path, for example, my J, you choose that by holding the Ctrl key (gives you the white arrow) and clicking near it. If you want to select the whole path, you can do that by holding Ctrl and dragging out a rectangle with that arrow around the paths.
|
I hope you enjoyed this tutorial!

|

|
|
|
RETURN to Janee's Archive Tutorial Index
email me!
Ask tutorial questions in the myJanee.community:

|
|
|
| All material in this site is ©2001-2020 by myJanee.com Graphic Creations. No part of it may be used without my written permission. If you have questions or comments about this site or its construction, contact Janee by email. |
|
|
|
|