 Porcelain Effect Porcelain Effect
Have a look at my NEW Porcelain Effect tutorial!
This is a very sweet effect to use for intimate family-type portraits. It looks especially charming when used on snapshots of children like Mira here. Though it is usually done in a studio, using special lighting techniques, we can do this effect handily in Photoshop!
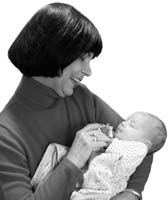
For this tutorial, I'll work with a photo of Mira's Bubbe and her baby sister Hannah.
This tutorial was written for intermediate users of Photoshop who have some experience with working with Adjustment Layers and Layer Masks. It will work with Elements, but you have to have some experience working with Elemasks. I wrote the tutorial with PS v.7, but it will work just fine with any version later than 4.
|

|
| 1. Setting up.
For this effect, quality of your photo is not critically important. You will need to be sure that you have good contrast in the photo, though, and you may need to do a little retouching.
- Open your photo file.
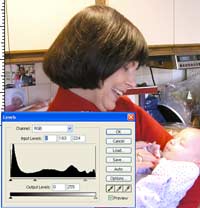
- Click the Create a New Adjustment Layer button at the bottom of the Layers palette. Choose Levels.
- Adjust the levels so that you have sharp contrast in your photo.
- Retouch out any glaring defects, using the Clone Stamp or the Healing Brush tool. The small details of the photo, like skin texture, will not matter in your result, so there is no need to be meticulous here.
- Create another new Adjustment layer, this time for Hue/Saturation. Pull the saturation slider to the far left, removing all color.
- Double-click the photo layer in the Layers palette to make it a regular (not background) layer.
|
 |
| 2. Begin removing the background.
We want a nice soft portrait, with all of the attention to be focused on the subject. Therefore, you need to remove any background, placing the subject against a layer filled with plain white.
- Create a new layer, fill it with white, and drag it to below the photo layer in the Layers palette.
- Choose the photo layer and use the Lasso tool to trace roughly around the subject's outline.
- Click the Add Layer Mask button at the bottom of the Layers palette. This will make most of the background disappear behind the mask. (The inset at left shows the Layers palette after the mask has been created.)
|
 |
|
3. Paint away the rest of the background.
- Take a paintbrush with black and paint over any remaining background on your canvas. This will paint on the Layer Mask, actually. (You know that you are painting on the Layer Mask, because you see the little circle-in-square icon next to the visibility eye.)
- Zoom in if you need to, for better accuracy. You will be losing some of the border, so don't worry about very fine things like wispy hairs. Similarly, don't worry about hard edges. These will be softened in the end.
- Once you have the background painted away, make a Merged Visibles layer above the other layers.
Tip: Making a Merged Visibles Layer: This takes a picture of everything you have showing, and places it on that new layer, merging your visibles, whilst leaving the layers intact below!
- Make a new layer and drag it to the top of the stack.
- Ctrl-Alt-Shift-E.
|
 |
| 4. Get ready to make the blurred layer.
Now we are readying ourselves to make the layer which will eventually impart the soft "magic." You won't want to have this pronounced softness on your entire image, though. In particular, you want the main facial features to be left more crisp.
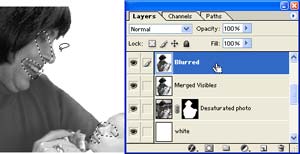
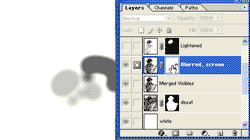
- Duplicate the Merged Visibles layer.
- Label the top one of these "Blurred."
- Using the Lasso tool, select the eyes, nostrils, lips, or any other features you want to keep crisp. Holding the Shift key enables you to add to the selection.
|
 |
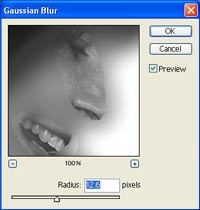
- 5. Finish the blurred layer.
- Ctrl-Shift-I (or Select > Inverse) to invert the selection. Now everything BUT the features is selected.
- Filter > Blur > Gaussian Blur. The amount of blur you choose will depend upon the resolution and size of your image. You want the image to be pretty much unrecognizable, except for the features you have selected out.
|
 |
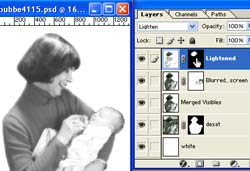
| 6. The MAGIC!
At this point, the image looks hopelessly bad, but hang on!
- At the top of the Layers palette, change the Blending Mode for the Blurred layer to Screen.
Now this is pretty good... but notice that we've lost some detail on the baby's face. In particular, I want to preserve the outline along the top edge. I would like a bit more detail in the fingers, too.
|
 |
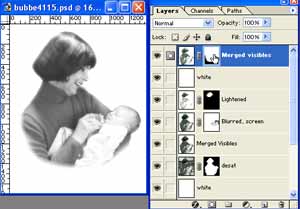
| 7. Use your artistic hand.
Don't panic! This is painting, and you CAN do it!
- With the Blurred/Screened layer chosen, click the Add Layer Mask button at the bottom of the Layers palette.
- Choose black and a large soft brush. In the options at the top, reduce the brush opacity to about 20%.
- Paint along any edges you want to preserve.
In the illustration to the left, I've shown the Layers palette with just the mask, to show how you don't have to get detailed with this painting.
|
 |
| 8. Touchups.
You may have some areas which you want to have lighter, or you may want the whole portrait to be lighter. If this is the case, duplicate the Blurred/Screened layer. You will see that the image gets lighter each time you duplicate this layer.
For my portrait, I wanted her hair to be lighter, especially the shadowed area at the bottom. Here's how I fixed this:
- Duplicate the Blurred/Screened layer.
- Click the Add Layer Mask button.
- Fill the mask with black. This renders the new layer invisible.
- To make JUST the hair lighter, we want JUST the hair to show from the new lighter layer. Take a soft brush and paint white on the mask to make the hair from the new layer visible.
|
 |
| 9. Soften the portrait's edges.
Because we deleted the background, the only "edge" we have to soften is the bottom.
- Create a new layer above all the other layers and make this a Merged Visibles Layer. (Remember how? See the tip in Step 3, if you need a reminder.)
- Make another new layer and drag it to just below the Merged Visibles Layer. This will be your new background.
- Fill this layer with white.
- Choose the Merged Visibles layer you just made, and add a Layer Mask to it.
- Grab a soft brush with black and paint away the bottom border.
|
 |
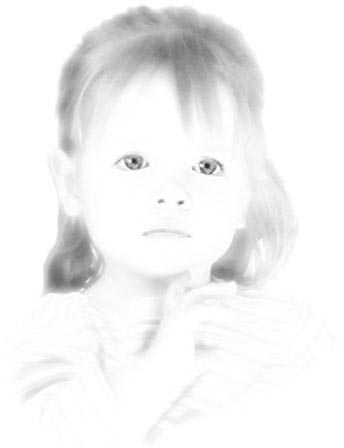
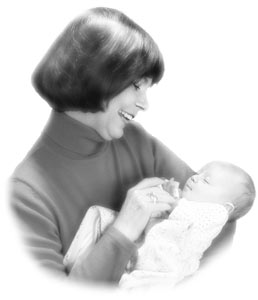
| The final result!
I hope you enjoyed this tutorial!

|
 |
|
|
RETURN to Janee's Archive Tutorial Index
email me!
Ask tutorial questions in the myJanee.community:

|
|
|
| All material in this site is ©2001-2004 by myJanee.com Graphic Creations. No part of it may be used without my written permission. If you have questions or comments about this site or its construction, contact Janee at myJanee.com Graphic Creations by email. |
|
|
|
|