| Wait! Start from the
BEGINNING!
I have put this page together as a reference for those who get stuck on parts of my tutorials. If there is anything that I am missing here, PLEASE let me know!
Throughout my tutorials I assume a basic knowledge of how to get around in your own operating system. I work in Windows and so that is what i use for my directions. If you are using a Mac, here are the shortcuts:
| Windows |
Mac |
| Ctrl |
Command |
| Alt |
Option |
| Right-click |
Ctrl-click |
|
 Click this "key" to get to a printable graphic to help you remember these keyboard equivalents. Click this "key" to get to a printable graphic to help you remember these keyboard equivalents.
As is the general convention, "Layer > Effects > Make layers" means, "Click Layer in the top menu. From the dropdown box, choose Effects. From that flyout box, choose Make Layers."
|
|

The best way to learn Photoshop from the beginning is to take my Photoshop Launchpad classes!
|
|
Open
a File.
For this, or for "File -> Open" do the following: Click on
"File" right under the Adobe Eye on the very top bar of your
Photoshop window. Choose "Open" from the dropdown box.
Find your file and click ok. |
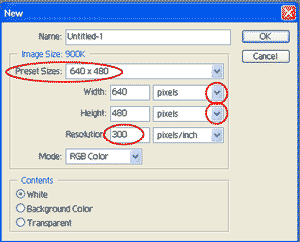 |
New File.
For this, or for "File -> New" do the following: Click on
"File" right under the Adobe Eye on the very top bar of your
Photoshop window. Choose "New" from the dropdown box.
Choose a size for your file that is larger than you think you need. When
I say "500x500", I mean 500 pixels x 500 pixels. Choose what
unit you want by clicking that little arrow (circled to the right).
Be sure that RGB mode is chosen. Click OK. |
Make
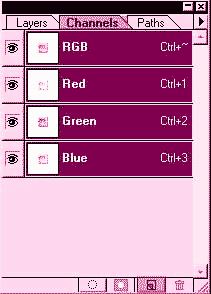
a new channel.
Find your Channels palette. It is most likely grouped with your Layers
palette and it looks something like the one at the right.
Click the little "new channel" icon down beside the trashcan.
Your new channel will show up as Alpha 1, your background for it will be black, and your foreground and background colors in your toolbox will be black and white.
(For a really good article on channels, see PS Tips from the Newsgroups. For the best beginning tutorial on the use of channels, see my Heart 3 Tutorial.)
|
 |
| To
make your foreground/background the default white/black, click your mouse on that little white/black thing where i have the circle in the toolbox to the left.
A shortcut for going to Default colors is to simply type the letter D on your keyboard.
The little double-headed arrow above the color picker squares eXchanges the foreground and background. Alternatively, you can type X to do this
|
 |
Saving
Files.
When you first save a file, click in the top menu, File -> Save As .. and think of a name for
your file. Leave the file type as PSD. This will maintain your layers and the
quality of your work. Everytime you re-save a jpg file, the quality of
it degrades a bit; you lose some information in your picture. So keep it
in a PSD file until you need to have it in a jpeg.
If you want to send this work to your Aunt Bertha, submit it to the Artist-of-the-Week contest, or print it out to frame for your desk, you will want to make a copy of this in jpeg format. But don't get rid of your PSD. Don't flatten the PSD. Keep reading.
(Notice that i said "a copy". Do not get rid of your psd files as you finish your work. Saving the PSD file will preserve your layers so that if you want to later change that yellow glow to purple, you can. It also prevents the "lossiness" that I discussed.)
|
To save as a jpeg, do this:
File -> Save a Copy (In version 6, it is File -> Save for Web or File > Save As...) and choose .jpg from the format types in the dropdown box. Find a suitable place for it and then click Save or OK.
It will ask you for a quality setting. If you have "preview" checked, you can watch your artwork degrade before your very eyes as you slide the slider down toward 1, and then get better as you move up toward 12!
The catch here is that your file size increases dramatically as you go to better qualities. You will have to compromise some quality in order to get reasonable load times on the web.
|
| Using Keyboard Shortcuts. Alt-Backspace, Ctrl-D, etc. To use a keyboard shortcut such as "Alt-backspace", hold the Alt key while you click the backspace key. Then release both. There are many many keyboard shortcuts but i will not list them here. Trevor has them in his site though. Find him in my PS Resource Links > TIPS. |
Throughout my tutorials, I use Windows modifier keys. If you have a Mac, here are the equivalents:
| Windows |
Mac |
| Alt |
Option |
| Ctrl |
Command |
| Right-click |
Ctrl-click |
Click this "key" to get to a printable graphic to help you remember these keyboard equivalents.
|
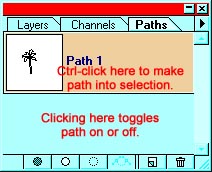
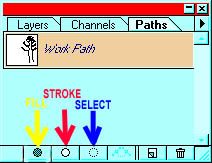
| Paths
Palette.
If it is not visible already, go to Window -> show paths.
|
|
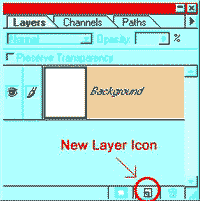
| Making
a new layer:
My favorite way to make a new layer, is to click the new layer icon in the layers palette. (If this palette is not visible, go to Windows -> show layers.) Another way to make a new layer is Layers -> New layer. You can also use this command to make a new layer out of something that you have selected.
|
 |
| Colors
When I refer to a color, I usually use its hexadecimal code number because i find that to be the easiest for me. To get to the hexadecimal code, here is what you do. Click the color swatch in your toolbar and you will get a dialog box. If it looks like this one at the right, then click on Picker. This will give you the box below right.
|
 |
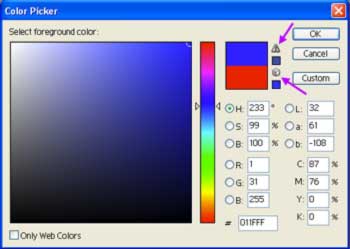
| This is the Color Picker
dialog box. If you haven't had a chance to, this is a fun thing to play
with because there are several things going on in this box.
When I refer to a color number that has 6 digits (Some may be letters), this refers to the hexadecimal number. In this palette, I have typed in my favorite color to use for gold, BEAD90. That color shows up in the little circle and also in the top rectangle next to the OK button.
Clicking on the little cube next to that will give you the nearest "web safe" color.
|
 |
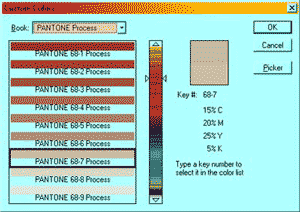
| An alert triangle there tells you that you have chosen an unprintable color, that is, one that cannot be made out of cyan, magenta, yellow, and black. This pretty blue hue, for example, is not printable. The little square below the alert triangle shows the closest printable color, while the square below the cube tells what the closest websafe color is.
Note: If you are going to send your work to be professionally printed, it is best to use Pantone Coated or uncoated. . This gives the colors their correct color name. This enables the printer to know exactly what color the client wants.
|
 |
| My
Palette is Invisible! |
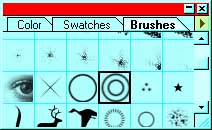
If the tab for your desired palette is not visible, click Windows -> Show .. and choose the palette you want. If there is no "show" but "hide" is the only choice, then your palette is out there somewhere, maybe just hidden behind another. If this is the case, to find it quickly, click Hide Brushes and then Show Brushes. It will bring your Brushes palette to the top!
|
| Goodies
folder?
|
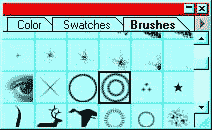
Yes, if you are running PS 5.5 or 6. For version 5.5 and 6, Adobe packed a little folder with some more things for you! Here is what you do to get to them. Suppose you want to get at those cool brushes. In the brushes palette, over to the top right there is a black arrow. Click that and then click "Load Brushes". It gives you a window to browse for your brushes. This is the path where mine are and yours is probably pretty close:
C:/Program Files/Adobe/Photoshop/Goodies. Double-click that Goodies folder and it will open to show you all the cool things you can get. Click the brushes folder and open it. Select the collection that you want and it will appear in your collection!
For Version 6, you can get to more brushes, but differently. The brush files are located in the brushes options for Version 6. Click on the little arrow to the right of the brush size indicator in the options bar and you should get a little box like the one to the left. Then click the upper right arrow on that box and you will see, I hope, a listing of brush files at the bottom there. You can also use load brushes if you have some from an outside source.
(As an aside, in order to adjust the individual brushes for your use, you can click the actual brush size indicator, instead of the arrow to its right, to adjust angle, spacing, etc.)
|
|
|
|
I hope you enjoyed this tutorial!

|
|
|
|
RETURN to Janee's Tutorial Index
Ask tutorial questions in the myJanee.community:

|
|
|
| All material in this site is ©2001-2003 by myJanee.com Graphic Creations. No part of it may be used without my written permission. If you have questions or comments about this site or its construction, contact Janee at myJanee.com Graphic Creations, 7193 W Gifford Rd, Bloomington, Indiana, USA 47403 or by email. |
|
|
|
|