Creating Animations in PS/ImageReady Creating Animations in PS/ImageReady
This tutorial is completely outdated. A rewrite is now posted! My current tutorials are at THIS LINK.
|

I'm writing this tutorial with PS CS (8). If you are using another version of PS, your screenshots may look a bit different, but the instructions will be fine for you.
Animations work much the same in PS/ImageReady as they do in PS Elements 2, only they are actually a bit easier to do in Elements. Again, if you have Elements, follow along here to see how they work. I'll have a tip for you about how Elements differs.
|
|
Graphic animations are like short movies. We generally make these in either Flash (swf) or as animated GIF. Here we will work in Photoshop and ImageReady to make an animated GIF.
Like movies, animations are made of frames, and you make these frames as layers in Photoshop. Of course anything can be animated, but I'm going to make an animation out of this smiley, creating the somewhat sassy character in my header.
Let's go!
1. Begin by making the base image on a separate layer from the background.
|
 |
| 2. Make several copies.
Because we're going to base each of the frames upon this image, make several copies of this layer. (I ended up ultimately with 10 frames, all based upon this layer.
|
 |
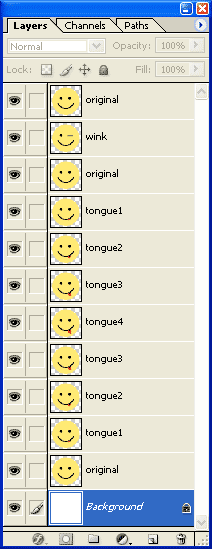
| 3. Create all the different frames... as layers.
Turn off the visibility eyes for all but the next to the bottom layer. Then begin at the bottom layer and work your way upward, making each of the frames onto its own layer.
4. Label each layer as you go along.
This makes it easier to see what each layer does. If you want to have the same frame repeating, you can copy this frame by duplicating its layer and then moving it wherever you want it in the layers palette.
|
 |
| Ok.. This next part is where Elements users have a different, much more straight-forward procedure.
Instead of jumping to ImageReady, Elements Users, JUMP down to the note at the end of this tutorial!
5. Photoshop Users.. proceed.
Now we are going to Jump to ImageReady. Ready... set.... Jump!
Click the Jump to ImageReady bar at the bottom of your Toolbox.
This opens ImageReady!
|
 |
|
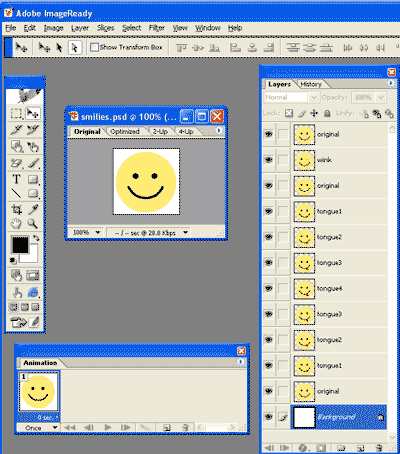
6. Have a look around.
If this is your first look at ImageReady, calm down a bit. It isn't exactly like Photoshop. Some things are missing, there are NEW things, and some functions work a little differently than they do in PS. But this will be ok. ;)
The palettes you will need are the Layers palette (right), and the Animation palette. If you are missing either of these, go to Window > ... and click the one you are missing. Same as Photoshop!
|
 |
|
| 7. Making the animation background transparent.
Let's make our animation so that the background is transparent, too. To do this, begin by turning off the visibility eye on the background layer.
8. Show only the layer for the first frame.
Next, we will put each of our frames into the animation palette. Notice that the first frame already has an image in it. We have to make it the image we want, though, so go on and turn off all the visibility eyes except for the bottom layer. There. that's the first frame.
|
| 9. a. Making the rest of the frames.
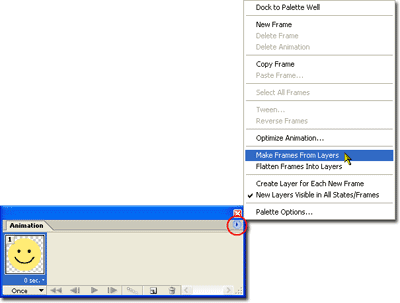
There are at least a couple of ways of going about this. If you have all of your layers carefully set up, as I do here, with one layer for each frame, you can use the handy little flyout arrow in the Animations palette and choose Make Frames from Layers. (See next image below.)
Tada! Done! Head on down to Step 12.
If you have some image elements on different layers, though, you may want to do the "Brute Force Method." I go through this in steps 9 - 11.
|
|
|
|
9. b. Make the second frame.
Now click the New Frame icon at the bottom of the Animations palette. (red arrow at right) This makes a new frame.
|
 |
| 10. Show the layer for the second frame.
Make this frame look like you want by turning on the visibility eye for the next layer up. For my animation, this was the layer I called tongue1.
|
 |
| 11. Making all the frames
Now you sort of get into a rhythm -- new frame.. show layer... new frame... show layer... till your layers are all visible and one is in each of your animation palette's frames.
|
| Tip: Keeping filesize small.
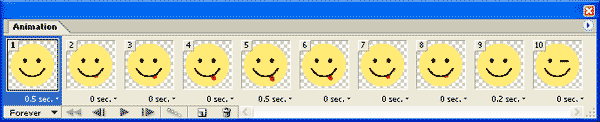
Notice that in the animation palette below, frame 1 and 11 are identical. This is fine if i want it to play once, but if I have this in a forever loop, it is goofy to have it this way.... and it makes the file unnecessarily large. Each frame increases your filesize!
It's better to just have the beginning frame paused a bit longer. I'll fix that in a minute. ;)
|
|
|
|
12. Time to set up the timing!
- If your animation is to be continuous, hit the dropdown where it says Once and change it to "Forever."
You can also make it play a certain number of times, by pressing the Other... button.
- If you know that you want your animation to go slowly, or to pause on certain frames, you can set the time for each frame to show in the dropdown for that frame. By default it is 0 seconds.
|
 |
|
Now to try it out and tweak as necessary. You will do all the tweaking in the Animations palette, but you will preview what it looks like in the image window.
13. Try out and Tweak
Hit the Play button. It's the single triangle that points to the right. As you hit it, keep an eye on your image window and maybe even cover up your animations palette, if you find it distracting.
The image at the right came from the settings in the animation palette just below.
(Remember that extraneous frame 11 that I'd made and decided I did not need? Click it to select it and then hit the Trashcan at the bottom of the Animation palette. Gone!)
|
|
|
| 14. Changing the size of the image
You change your image size in Edit > Image Size unless you already had the size you wanted in Photoshop. If you reduce the size in ImageReady, though, don't forget to UNDO this before you save your file.
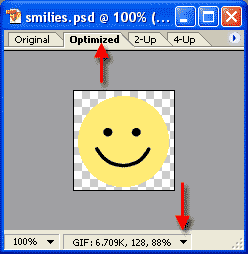
15. Optimizing the animation.
In your image window, you have 4 tabs, kind of like the Save for Web dialog box in Photoshop. Choose Optimized if you want to see how your optimization settings make your image look.
Widen your window a bit and you can click the dropdown to see how large your filesize is at these settings.
|
 |
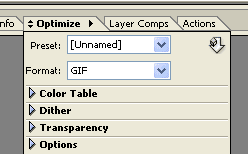
| 16. Changing Optimization Settings.
If you need to have different optimization settings, you can change them in the Optimize palette. (Window > Optimize if you can't see it)
|
 |
| 17. Saving the Animation.
This isn't quite as tidy, imho, as File > Save for Web, because you don't get all the nifty image sizing and optimization controls right there. Nay, you have to do all these ahead of time. But at least saving the animation is just a one-step process.
File > Save Optimized as... and name your file!
|
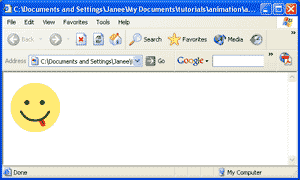
18. Try out the animation!
You can preview an animation in ImageReady, as you just did, but you can also view it in your browser. In Internet Explorer, go to File > Open ... Change your file type to All files, and find your file. Hit Open and you should be able to see your animation!
|
 |
| Elements Users:
Follow along through Step 4. Then you will do this:
Making the animation background transparent.
Let's make our animation so that the background is transparent, too. To do this, begin by turning off the visibility eye on the background layer.
5. File > Save for Web. You'll get the standard Save for Web dialog box. You may have noticed some animation stuff in there. Here's how to get it to work:
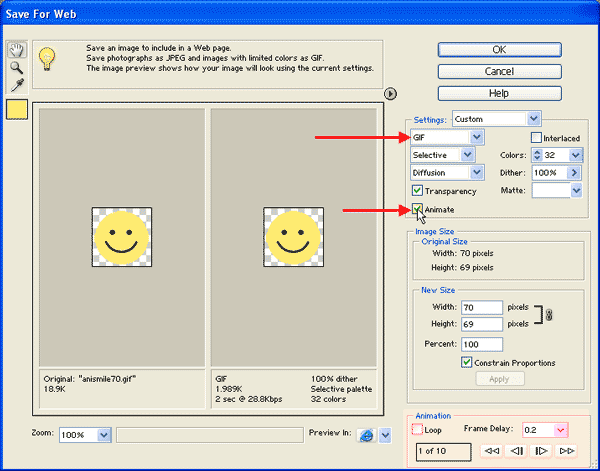
6. Have a look around. First off, you'll need to change your filetype to GIF. You can't animate JPG's. Then check the Animate box. (See red arrows above.)
This will make the Animation box in the lower right corner become active. Check the Loop box if you want it to keep playing over and over.
Use the arrow keys to preview your frames. They will be the layers you set up in your layers palette, working from bottom to top!
As you progress through your frames, you can adjust the timing for each.
Then you can preview your animation by pushing the button for your browser right beside the Animation panel in the same dialog box.
After previewing, you may want to tweak further, adjusting timing.
Check your filesize below the optimized view.
Reduce your color count if necessary to get the filesize you want.
More on saving for the web and transparent gifs.
|
|
| I hope you enjoyed this tutorial!

|
Janee's Photoshop & Elements Classes |