|
Break Out of that Frame!
a Tutorial for Photoshop or Elements
|
 |
|
|
See my ALL-NEW tutorial on Breaking out of a Frame.
This is a neat effect which you can do with a little patience and just a few steps!
We'll be doing this using Photoshop's Quick Mask. If you're using Elements, we will have special directions for you, so pay attention.
|
|
|
This tutorial will work just fine with any version of Photoshop. I wrote it using PS CS, so the screenshots are from that program. If you're using another version, your screen will look a bit different from mine, but you'll get the same results.
Elements users, I have written special directions for you, starting after step 2b. Your software can handle just about anything you can throw at it!
|
|
As you work through this tutorial, you'll learn or practice the following:
- Working with layers
- Using a Paintbrush
- Working with Quick Mask and all its options
- Converting a Quick Mask into a Layer Mask
- Editing a Layer Mask
- Creating a realistic shadow
|
|
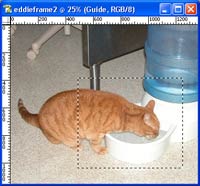
1. Make the Frame
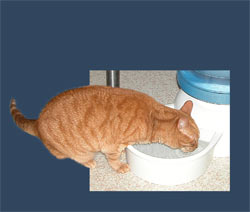
Begin by figuring out where you want your frame. Use a selection tool to select the area you want framed. I used the Rectangular Marquee tool.
a) Make a selection of the part you want to have showing.
|
|
|
b) Inverse the selection (Select > Inverse).
c) Make a new layer by clicking the Create a New Layer icon at the bottom of the Layers palette. Label this "Frame."
d) Choose your frame color in the Color Picker.
e) Alt-Backspace to fill. Ctrl-D to deselect.
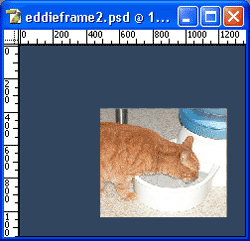
For now, you can see this layer, as at the right.
f) If your photo is on the Background layer, double-click it in the Layers palette and name the layer "Photo."
g) Drag this frame layer beneath your photo layer in the Layers palette. Now the frame is not visible.
|
 |
 2. Make the Quick Mask 2. Make the Quick Mask
In PS, you'll be using a Quick Mask next. This is just a handy way to make a more complex selection.
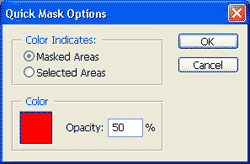
First, double-click that button that shows in green to the left. This is the Enter Quick Mask button. Clicking this brings up your Quick Mask Options.
Be sure that Selected Areas is chosen, and click OK.
a) Now, if you've deselected the frame, area, reselect it. Do this by Ctrl-clicking the Frame layer in the Layers palette.
b) Inverse this selection. This time, use the keyboard shortcut: Ctrl-Shift-I. Only the outline around the frame will be selected. [Elements users, head to the Elements Notes!]
c) Click the Photo layer in the Layers palette to make it active.
d) Click the Edit in Quick Mask Mode button, shown in green in the toolbox to the left. This should give you something on the order of the image to the right.
|
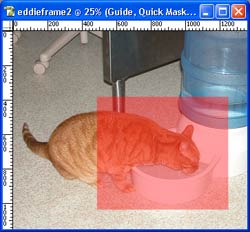
Your image should look like this after 2.d..
|
NOTE: If the pink part is on the frame, instead of on your subject, don't panic! You just got ahead of yourself and didn't check your Quick Mask Options, but all is not lost!
Double-click that Enter Quick Mask button. This will give you your Quick Mask Options.
You have Masked Areas chosen there, but you want Selected Areas. Change that and THEN your image will look something like mine
|
|
|
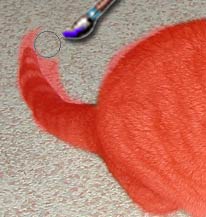
e) Choose your Paintbrush and be sure that black is your foreground color. Now paint over any part of your image that you want "sticking out" from the frame. Here, I'm painting Eddie completely.
|
|
Quick Masking Tip:
If your Quick Mask color is too close to colors in your image, you can change this! Double-click your Quick Mask icon in the Toolbox and you'll access the QM options.
|
|
|
Quick Masking Tip:
If you slip and paint some of the background, no worries! Hit X on your keyboard to change your foreground/background colors. White erases on the quickmask!
|
|
3. Convert the Quick Mask
Now we need to tell Quick Mask what to do with these painted areas. We want the painted area to be preserved (masked), whilst the rest of the photo will be hidden.
a) Double-click that QM icon in the Toolbox, and choose Masked Areas.
|
|
|
This will reverse the area covered by the Quick Mask.
|
|
|
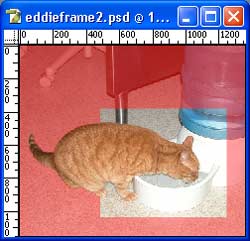
b) Click the Edit in Standard Mode button, shown here in red.
This will leave just the part of the image you want to SHOW selected.
|
|
|
c) In Photoshop, click the Add Layer Mask button at the bottom of the Layers palette.
Shazam! There you are!
d) If you need to do any touching up of the image, you can click that layer mask in the Layers palette. That's the black and white square which is clipped to the photo layer. Use your Zoom tool and a small paintbrush to neaten your edges as needed.
|
|
4. Make it Real
One of the dead giveaways that an image is faked is a lack of shadows. You can fix this, by adding a shadow to the part of the image that's outside the frame.
a) Make a new layer beneath the photo layer and, using a Shading brush, (opacity 100%, Flow 30%, Spacing 30%), and black, paint some shading under the parts that are "breaking out" from your photo. Use a soft eraser to clean this up and make it subtle. Reduce opacity of this shadow layer, as needed.
b) If you want to add a shadow to the framed part, you can do that with a Drop Shadow Layer Style.
|

For this example, I've filled my Frame layer with white.
|
|
Note to Elements Users:
Takes off from step 2. b) above.
Elements users, you don't have Quick Mask, but you have something just as cool.
You've followed the tutorial through 2.b. You have inversed the frame selection.
Click the photo layer to make it active.
a) Choose the Selection Brush from your Toolbox and put it into Selection mode in the Options. You'll "paint" your selection using the Selection Brush.
b) If you over-select, or accidentally select something that you don't want, hold the Alt key and paint away your error!
c) When you have all your object selected, go into Masking mode in the Options.
Now's the time to add your Elemask. For more on Elemasks, and for some possibly-helpful screenshots, see THIS TUTORIAL.
d) Click the Create a new Adjustment Layer and choose Hue/Saturation. Click OK without changing anything. This is your Elemask layer, and the white & black square there is your Elemask.
e) Drag your Elemask layer to beneath your photo layer and above your Frame layer.
f) Alt-click between your photo layer and the Adjustment Layer and there you are.... well, sort of! You should have a HOLE where your original frame opening is. Urgh! Easily fixed.
g) Click your Frame layer and FILL it with your frame color.
Resume the tutorial at step 3.d. above! :)
|
|
Another one I did:
Student Work:
|
I hope you enjoyed this tutorial!

|