Love your Pen 2: Love your Pen 2:
Enlarging a Logo |
|
| Enlarging a logo... when would you ever want to enlarge a logo? I don't know, but it is something that I find myself doing from time to time.
For example, if you are given a logo that is 100 pixels wide, and you need to put it on a 9' x 7' banner... well, you will need to enlarge it. Just transforming won't cut it, because you need crisp edges!
As you work through this tutorial, you will work with some skills which will serve you well:
- Using Shape tools and Pen tools to make and edit a path.
- Enlarging a Path.
- Filling and stroking a path.
|
Any graphic image will work fine for the purposes of doing this tutorial. If you want to use this dinosaur, for use ONLY with this tutorial, here's how:
- Right-click the picture.
- In the dropdown, choose Save As...
- Put it where you will find it.
|
This tutorial is for you if you have Photoshop and want to get a bit more familiar with the wonders of the Pen tools.
I wrote this with Photoshop 7, but it will work with other versions. It will not work with PS Elements, since Elements doesn't use paths.
|
| For this tutorial, I'll work with this little dinosaur I made for my recent Elements 2: Tips & Tricks book, (now being reprinted by Apress.. yay!). I actually made the dino in Elements, using shapes, my eraser, and lots of patience! (Elements doesn't have the natural tool for this job, the Pen!)
1. Open the logo file. My file is tiny, just 100 pixels wide. I'll show here how to enlarge this so that it could cover the side of a blimp!
2. Choose your Pen Tool from the toolbox.
3. With the Zoom tool, zoom in tightly on your logo.
|
 |
4. Tap your pen around the edges of your logo dropping anchor points.
NOTE: Only drop them at the points where the curve changes direction. If it is heading around in a clockwise circular direction it would be a change in direction if it suddenly gets straight and goes out from there. You will have a harder time making a smooth curve if you have too many anchor points.
|
 |
| You now have a bunch of corner points. Not the goal! We need smooth curves. What you will do next is to use the Convert Point tool to drag out handles which will be TANGENT to the curves you are forming. By manipulating these handles, pulling them longer, and changing their direction, we shape the curve.
5. To begin shaping the curves, you need to click the path with the Direct Selection arrow, first. This will make the Anchor Points show once more.
|
 |
| 6. Choose the Convert Point tool. Click-drag it on one of the Anchor points. As you drag, you will bring out the handles for the tangent line.
|
|
| NOTE: If you click that same point again, OR if you click one of its handles again, using the Convert Point tool, your point will become a corner point again, and you can manipulate the handles separately. |
 |
| Another NOTE: If you don't want a corner point and you need to go back to manipulate the handles, hold the Ctrl key. This changes your tool to the Direct Selection arrow again, enabling you to do this. |
 |
|
|
 |
| Eventually, you will have the whole outline shaped.
|
 |
|
TIP: Hide that Path!
When you are working with paths, sometimes that little line gets annoying or you need to see what's behind it. To hide it, either click the checkmark in the options bar or click the empty space below the paths in the Paths palette.
|
| But what about the eyes and the black contour lines for the leg and arm? You can make them part of the path, as well!
7. Begin with the eyes. Choose the Ellipse shape tool, the Path option, and the Subtract from Path button. (See right.) Now, when you make your ellipse, it will be subtracted from the path, creating an elliptical hole in your shape.
8. Drag out the ellipse for the left eye.. then the right. Or the right...then the left. Hey.. be free! As long as the Subtract from Path choice is clicked, whatever path you make will be subtracted.
9. Continue in this way to make a path for each nostril, for the mouth, for the leg and for the lines for his arm. This part will be subtracted from the shape. So when you fill in the dinosaur, these places will not be filled.
If you want the eye pupils filled as i did, click the Add to Path choice. Then make the circles for the pupils.
|
 |
|
|
 |
|
Clicking the tab for the Paths palette will give you this view.
|
|
| Now let's try enlarging this path.
10. Make a New document at whatever dimensions you like. If you are going to print it, make it 300 ppi. If it is for the web, 72 ppi will suffice.
You should now have both documents open on your desktop with your paths palette open on the first file.
|
 |
| 11. Drag the path from the Paths Palette of the first file onto your canvas for the second file. |
 |
|
12. Edit > Free Transform Path.
|
15. And holding Shift to constrain your proportions, drag the path as large as you want it.

|
|
13. Make a new layer for the second file. This is where you will put the pixels for the enlarged and quite fiersome dinosaur.
|
 |
| 14. Choose a color for your dino (this is #01AF6C) and hit the Fill Path button at the bottom of the paths palette.
|
 |
15. But what if we want to fill in the places where there is black? We have a couple of different ways we can proceed here. If you want to use the paths we made, you can fill them in like this:
- Make a new layer, onto which you will put the black parts.
- Use the black Path Selection arrow to click the part of the path you want to use.
- Click the ADD to path choice in the Options. Otherwise, it will think that you want to fill in everything BUT this. (Doesn't make much sense to me, either, really.)
- Choose a different color (like black!)
- Click the Fill Path button on the bottom of the Paths Palette.
- Repeat for any other parts of the path.
|
 |
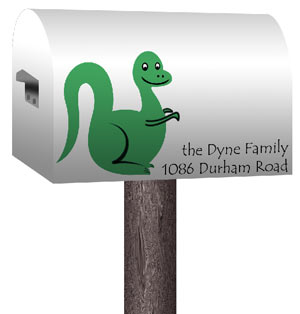
| 16. So... what's the big deal about this? Well, for one thing, now that your logo is in vector path format, you can scale it larger or smaller, still maintaining all the crispness of the original. Matchbook or mailbox... either will be crisp and clean.
|
 |
|
Digression: Making the graphic into a custom shape.
Another cool thing you can do with this path is to make it into a custom shape!
- First be sure that you have the right Shape Set open. This is the Shape Set to which your new shape will be added. To load a new Shape Set, in the Shape Options, click the arrow that appears just to the right of the shape as shown in my screenshot to the right.
- With the Direct Selection arrow, click the path in the Paths palette.
|
- Edit > Define Custom Shape.
- Now your shape will appear at the bottom of your shape set.
- Go a little wild making dinos with different colors or layer styles.
|
I hope you enjoyed this tutorial!

|
|