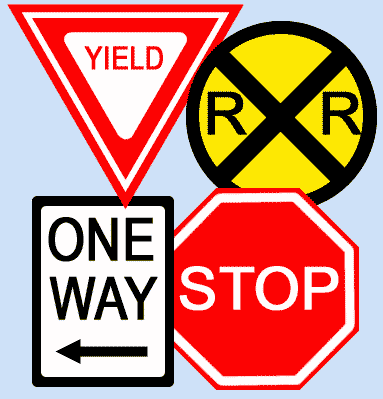
Give me a Sign! Give me a Sign!
(or Options of the Shape Tools)
See my all NEW Show me a Sign Tutorial for Photoshop!
We will explore the options of the shape tools and get some practice with using the shape tools through a few little projects, making some common US road signs.
File -> New.. and make it pretty large, like 1000 pixels square. File -> Save as .. and make it psd format and name it givemeasign.psd.
|
Most of the steps in this tutorial work fine with Photoshop Elements 2, as well as with Photoshop versions 6+. There is one part in the Stop sign where your directions will be different if you are using Elements. Look for the blue box!
|
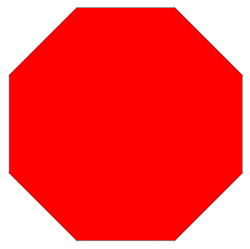
| Let's start with stop.
1. Make the red octagon. In order to do this, you have to tell PS exactly what you want: a red, 8-sided polygon which has the path with it. (This is called a shape layer.)
- Choose your shape tool and then choose Polygon from the options.
- In the options bar, just to the right of your geometry options, there is an arrow. Click that and make sure that there are no boxes checked. Click the arrow again to turn off that box.
- Where it says "sides," put an 8 in there.
- Click the Shape Layer button to the left in the Options bar.
- Choose red for your foreground color.
- Now put your cursor on the canvas and drag out an octagon. Make it bigger than you think you need. As you drag, notice that you can angle it however you want. (If you hold the Shift key here, what happens to your orientation?) Before you release your mouse, line up the octagon so that the top bar is perfectly horizontal.
Ctrl-S to save.
|
|
|
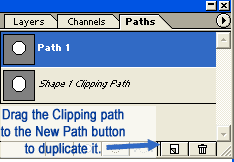
2. Make the white line. Now we are going to take the path that is around the red octagon and use it to make the white line around the inner rim. We could make a new path, but by using the old one and transforming it, we will make sure to get the exact angles. First we need to duplicate the Layer clipping path. Here's how:
- Click your red octagon layer so that it is active.
- Now click the Paths palette and then drag the Shape 1 Clipping path (In v. 7, it is called Shape 1 Vector Mask,) to the New Path icon to duplicate it.
|
|
NOTE to Elements Users: You knew that there was a reason that Photoshop is $600 and Elements is $99. Well.. one them is that you don't have the Paths palette. Therefore, you have to come up with a different way to do this white octagonal outline. Here's an outline of one way to do it:
- Make a smaller white Octagon and move it to the center of the red one.
- Make a red octagon which is smaller yet and center it inside the white one.
- Once you have your white octagon and the center red one, skip down to step 3.
|
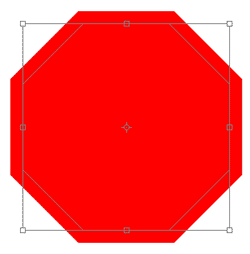
- Choose the Shape tool (or any other path tool) in the toolbox. Now Ctrl-T will bring up your Free Transform Path box. Now you are going to drag this path inward till it is where you want your white to be.
- Hold the Shift and Alt keys whilst you are dragging (and hold them down till after you release your mouse). (Shift keeps the proportions intact and Alt makes the transformation stay centered.) Click Enter to transform your path.
Note: Sometimes, inexplicably, the whole red octagon will get smaller, instead of just the path. If this happens, hit Esc and then go to Edit > Free Transform Path... and work from there.
- Click on the Layers tab to bring back the Layers palette. Make a new layer by clicking on the New Layer icon in the Layers Palette.
- Choose white for your foreground color.
- Click your paintbrush and choose the width of hard-edged (dot) brush that you want your white line to be. (In v. 7, click the brushes palette to be sure that you have no brush dynamics set.)
|
|
- Now, see that little button at the bottom of the Paths Palette that is colored in.. and then there is one next to it that is NOT colored in. Push the one that is not colored in. That is the "Stroke Path" button. It will go around your path with whatever brush you last picked in whatever color onto whatever layer you had selected in your layers palette!
- Click in your paths palette below your path in an empty space to make your path disapear.
- Ctrl-S to save.
Note: If you last used some other tool than a brush, your stroke will be a nasty jaggy black line. If this happens, Ctrl-Z to undo and then choose a brush and do again.
Another thing: If you forgot to make yourself a new layer or if you don't have the layer selected in your layers palette, it can't stroke the path just into the air, so the stroke button will be grayed out.
|
|
|
3. Make the lettering.
- Choose a better font than I did to do the Lettering.
And finally... Ctrl-S to save. (Yes, I know that i'm fanatical about saving. As you get more into this, you will be happy if you are in the habit of saving early and often. I hope to help instill this habit in you. :))
|
|
| Student Work:
|
|
|
| One way
Next, let's look at that One Way sign. There are a couple of things to point out about this. First, I did this as two rounded rectangles. First I did the black one, then i did the white one, a bit smaller, inside it. The "ONE WAY" is a text layer, and the arrow is a shape all its own. You can do this as a separate file if you want, or you can add a layer and do it in your stop sign file.
|
|
|
|
|
Make the black rectangle.
- Click on the shape tool and choose the Rounded Rectangle in the options bar. (This is a thing for which people who have had earlier versions had a deeply-felt need. And now we have it! YAY!)
- Ok, looking at that options bar, when you chose rounded rectangle, you got a choice of Radius (see above). This refers to the pixel radius of the corners of your rectangle. Put in a few different numbers there and try it out if you like. I used 5 pixels for my sign.
- Next, you need to choose from the three kinds of shapes. Do we want a Shape Layer with the path? Eh.. we don't really need that for this project, so let's just use the Filled Region.
- Choose black in your color picker and make a new layer.
- Then drag out your rounded rectangle.
|
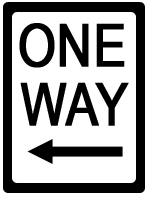 |
Make the inner white rounded rectangle.
- Make a new layer, choose white for your foreground colour, and pull it out just as you did for the black one.
|
| Make the arrow.
Ok.. now here is another cool thing. You can make an arrow out of the Line tool! The line tool in PS6 or 7 is in with the shape tools because you can do it as either a vector object or a raster object, the same as the other shapes.
- Choose your line tool from the tool bar and then look at your options bar. Again, we don't really need to be able to edit a path for this, so let's use "Create a Filled Region."
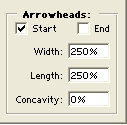
- Now, in the Option Bar, next to the line tool is the Custom Shape Tool. Then to the right of that is an arrow. Push that arrow and you will see the "Arrowheads" box like the one to the right. You can choose where you want your arrowheads, on the beginning of your stroke or on the end. The width and length refer to the size of the arrowhead compared to the width of the stem of your arrow.
- Next choose the weight of your arrow in the options bar. This refers to how many pixels wide you want the line to be. I made mine 10 pixels wide. Make a new layer. Choose a color. Drag out your arrow.
|
 |
| Now we are down to the sign's message. Choose a font and have at it! |
|
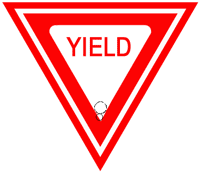
| I will leave the Railroad Crossing and Yield signs to you to experiment and figure out. I'll give you some hints, though :)
When i did the rounded corners on the white inner triangle for the Yield sign, I made a little circle with the elliptical marquee (hold shift to keep it circular) and then did Select -> Inverse. This makes a selection of everything BUT that little tiny circle. Then i took a little eraser and erased that point.
For the X in the Railroad Crossing sign:
- Choose the line tool and black for the Foreground color.
- Hold the Shift key (constrains angle to a multiple of 45°) while dragging out the lines on a separate layer. I made them too long..
- Then center the x in the middle before trimming off the ends.
|

|
| F. Stars, and Custom Shapes
In the next part of this tutorial, we'll look at using and making Custom Shapes
 What's the Vector, Victor? What's the Vector, Victor?
(examining vector vs. raster graphics)
 Using and Creating Custom Shapes Using and Creating Custom Shapes
 More Creating Custom Shapes More Creating Custom Shapes
I hope you enjoyed this tutorial!
Always me,

|
|
| Student Work: |
|
|
|
|
|
|
RETURN to Janee's Tutorial Index
email me!
Ask tutorial questions in the myJanee.community:

|
|
|
| All material in this site is ©2001-2003 by myJanee.com Graphic Creations. No part of it may be used without my written permission. If you have questions or comments about this site or its construction, contact Janee at myJanee.com Graphic Creations, 7193 W Gifford Rd, Bloomington, Indiana, USA 47403 or by email. |
|
|
|
|