Wooden Expression Wooden Expression
|
What you need: Use your own photo for this project. You have permission to use Drew's photo, but only for your own use. It, or its derivative works, may not be published anywhere.
You should have some texture image to work with, going into this. You can use a photo of old wood, tree bark, painted wood, stone, gravel, dirt, tire tracks, asphalt, marble, a leaf, a page from a book, sand, an orange skin, a butterfly wing, blue jean fabric, or any one of a zillion other things!
If you want to use wood and don't have a photo of wood, make your own using my Wood tutorial!
This tutorial is written with Photoshop CS, though it will work with earlier versions of PS just fine.
|
|
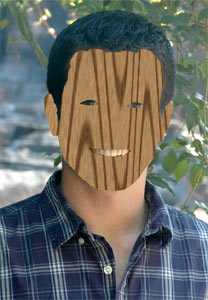
An animal made of pewter, a name carved into wood, or a vase of glass flowers -- we love seeing familiar things made with unexpected materials. In this tutorial, we’ll change a person’s face into wood! The methods you learn here will enable you to perform many other fun transformations, too!
This project presents some challenges. The first of them is to get the wood to seemingly wrap around the contours of Drew’s face and neck. This involves not only making the shadows and highlights follow the skin, but also, it means shaping the wood grain to follow his facial contours.
Level: The tutorial is intended for users at an intermediate-advanced level in the use of Photoshop. In particular, I hope you have had experience with Layer Masks, Blending Modes, and rudimentary painting.
But you know... if you are turned on by this effect, go on and do it! Then you can call yourself "advanced," when you're done!
Learning Objectives: After working through this lesson, you will be able to do the following:
- Demonstrate facility with the use of Quick Mask and Layer Masks.
- Transform a selection.
- Apply a Blending Mode.
- Move a masked layer independently of the mask.
- Use Liquify filter to distort a texture.
- Use a paintbrush to apply shading and highlights.
|
|
Step One: Bring the files together.
a. Open a closeup portrait of a person and a wood texture image in Photoshop. I'll use this photo of Drew, who very kindly gave me permission to mangle his photo for educational purposes!
b. Check Image > Mode for each of your image files, to be sure that they are both in RGB mode.
c. Choose the Move tool and drag the wood from its canvas over to the portrait. It will form its own layer, covering the photo. Transform to resize the wood layer to fit, if necessary.
c. Duplicate this Wood layer. Then click the visibility eyes for both Wood layers, rendering them invisible.
|
  |
|
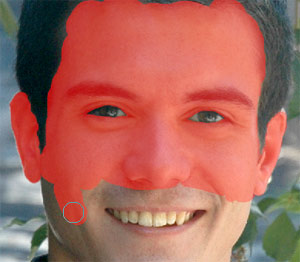
Step Two: Make a mask for his face. I like using Quick Mask (QM) for this. Before you begin painting, double-click the QM button near the bottom of the Layers palette to access the QM options. Pick the option for Selected Areas and hit OK.
Now use paintbrushes to paint “rubylith” onto the face. We’ll do the neck separately. Don’t worry about getting the mask perfect at this point. I’m not making his eyes or mouth wooden, so I’ll leave openings in the rubylith.
|
 |
|
Click the Exit QM button to turn your rubylith into a selection. The marching ants will be dancing around on the face.
Click the visibility eye for one of the Wood layers.
Click the Add Layer Mask button. Tada! …Awful!
|
 |
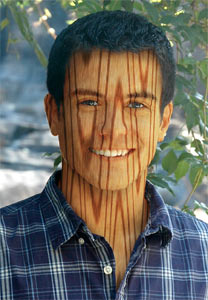
| Step Three: Apply the wood. At this point, there is wood on his face, all right, but it isn’t part of his face.
Fix that with a Blending Mode. Click the Wood layer and then double-click the Blending Mode "Normal" at the top of your Layers palette. Use the arrow keys on your keyboard to scroll down through these till you find one that does what you want.
For my example, Hard Light works well for the look I want. Try all of them to find your favorite! |
 |
|
Step Four: Tidy the mask. Click the Wood layer’s Mask and, using a paintbrush with black or white, clean up any rough parts of the mask. This will include the hairline, chin, and around his ears. Take your time, zoom in and use a small soft brush around these edges.
|
| TIP: Because we are using a mask, we have the flexibility of moving the wood around, resizing or rotating it. Unlink it from the mask by clicking the chain icon between the layer thumbnail and the mask in the Layers palette. |
|
|
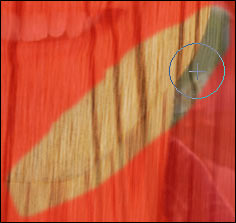
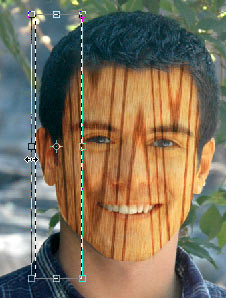
Step Five: Wrap the wood around the head. You don’t need a 3D program for this! The problem here is that the grain is equally spaced on the front of the face and around the sides, too. We need to compress it a bit around the sides. Here’s how:
Unlink the Wood from its mask and click the Wood layer thumbnail.
Make a rectangular selection which encompasses the left edge of the wood and extends to where you want the face begins to curve back – at about the corner of his eye.
Drag the left side of the transformation bounding box in, making the wood narrower in this area.
Repeat on the right side.
|
 |
|
Step Six: Cover the neck. Transform the other piece of wood just a bit smaller than the face wood, so that it looks a bit farther away. Then perform the masking for the neck using QM mode just as you did for the face.
Wrap the wood around the neck as you did with the sides of the face, by transforming side selections. Remember, you can unlink the neck wood from its mask and move it to suit you.
|
|
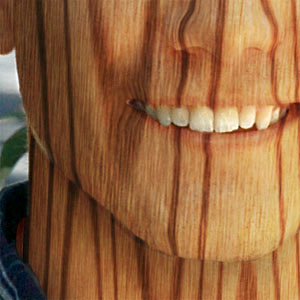
Step Seven: Carve some contours. If the face were a simple cylinder, we would be finished, but, thankfully, faces have contours!
I chose the Liquify filter for this subtle manipulation.
a. Duplicate the face Wood layer.
b. Then select an area of the face and use the Warp tool in the Liquify preview window. Check Show Backdrop, so you can see the face in the background.
Easy does it, for slight contours. If you overdo with Liquify, you can lose texture detail.
Around the neck, take advantage of the mask. Work outside of the masked area, drawing the wood inward, giving natural curves. Repeat this selecting and Liquifying for small areas until you are happy with the result.
|
 |
|
|
 |
|
Step Eight: Shade for realism! The Blending Mode handles some shading, but not enough for a realistic appearance.
Load one of the masks as a selection. Make a new layer and paint shading onto it.
|
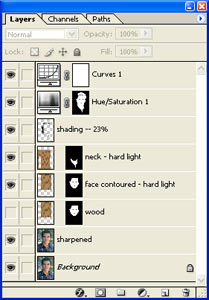
For shading, my favorite brush is large and soft, with spacing 30%, opacity 100%, and flow 30%. I added some shading to the right side of Drew’s face, around his hairline, under his chin, and near his shirt. Adjust opacity of the layer as you wish.
|
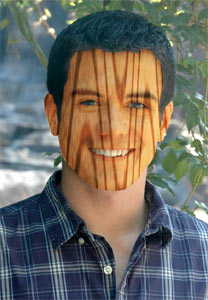
For final touches, have a look at your Histogram. If needed, use a Levels or Curves Adjustment layer to “pop” the image. I used a Curves layer and then a Hue/Saturation Adjustment to take the saturation down a bit for just the wood.
And there he is!
|
 |
|
|
Quiz
1 Why do both the photo and the wood files have to be in RGB mode?
2 Here, we do the facial contours using Liquify. What’s another way?
3 What is “rubylith” and why is that term used here?
4 What does the Blending Mode do to the Wood layer?
5 What choice in the Liquify Preview box enables you to see the face under the wood?
|
|
| I hope you enjoyed this tutorial!

|
|
|
|
RETURN to Janee's Tutorial Index
Ask tutorial questions in the myJanee.community:

|
Possible Answers for Quiz
1. Both images must be in the same color mode in order to combine them. RGB is the preferred mode in which to work on color images, partly because you’ll have full choice of editing tools!
2. Possible answers: Displacement Map, Shear filter.
3. Rubylith is the term for the red masking film which is used in conventional darkroom photo manipulation. The Quick Mask’s default red was derived from this.
4. Possible answer: It permits the wood texture to take on the tonality of the photo layer.
5. You can see the face under the wood if you choose the Show Backdrop option.
|
|
| All material in this site is ©2001-2004 by myJanee.com Graphic Creations. No part of it may be used without my written permission. If you have questions or comments about this site or its construction, contact Janee at myJanee.com Graphic Creations by email. |
|
|
|
|