Home myJanee.com Archives Janee's Photoshop Tutorials myJanee.com Art Challenge myJanee.community Janee's Galleries All Things Janee Contact Janee

myJanee.com --> Photoshop Resources --> Janee's Archive Tutorials -> This tutorial

Working With a Hairy Subject

In this tutorial we will extract a subject, hair intact, from her background, and place her into another background. As you work through this tutorial, you will get practice with the following:

  • Using layers
  • Using the Background Eraser
  • Using the History Brush
  • Patience

Penny before we moved her

If masking of hair were easy, everyone would have tutorials on the topic. As it turns out, there are several ways to mask hair, depending on the contrast between the subject and the background as well as other factors such as the amount of hair and its texture. But in any of the methods that I've found, there is no shortcut to getting around a bit of painstaking work.

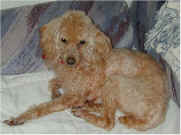
In my example, I'm using my little dog Penny. The background is not uniform, as backgrounds seldom are, and the contrast is not very great between the dog and the couch.

This was a difficult tutorial to do because i was not happy with the way it came out the first couple of times i did it.  I prefer, for this subject, the results that i got using the background eraser and that is the one i will present here. 

1.a.  File -> open and choose your file. Drag the layer in the layer palette down to the new layer icon to duplicate this layer. I'll call this the "dog copy layer".

  b. Click the new layer icon to make a blank new layer and fill it with black. If your subject were dark in color, you would want to use white for this layer. Drag the solid black layer below the dog copy layer. This black is so that you will see that you are doing a thorough job of erasing. You may have to touch up more when you get the subject against your desired background, but this will help.

   c. File -> Save As  and name your file something new.

2. a. In the tool box, choose the BACKGROUND ERASER. It is behind the eraser and has scissors beside it.

  b. Go to the Options palette and set your tolerance to about 30 to start off with. The higher this number, the less discriminating your eraser will be in choosing pixels to erase.

  c. With the dog copy layer selected, and aiming the + sign in the background eraser at the area just outside the fur, begin erasing.


3. a. If you end up erasing into the subject, then your tolerance is set too high. Adjust accordingly.

  b.  If you erase too much, either click back in your history palette, or use the history brush, the one below the regular paintbrush with the arrow swoosh over it. This tool "paints" the pixels back onto the canvas just as they were before you messed with them!

  c. What this background eraser does is it samples the pixels at the + sign and then erases pixels that are in the circle that are within the tolerance level of that particular color.

  d. File -> save.

4. a. Once you have the background pretty well gone from around your subject, draw a lasso around the subject as i have done above. Select -> inverse -> delete. This gets rid of everything but the dog.

   b. File -> Save.

   c. Open your new background and then with the move tool selected, drag the dog copy layer onto your new background.

   d. If the edges of your subject look too crisp, use the blur tool (the water drop that is under the smudge tool) or the smudge tool itself.

  e. Don't forget to make the background look as if your subject were really ON it. If the grass needs to be tamped down, if the sand needs prints, or your subject casts a shadow you will have to add these. Just use a NEW layer for this kind of touchup. Also you may need to lighten or darken your subject to make it go with the background.

Here is another photo that I altered using this same method.

  RETURN to Janee's Archive Tutorial Index

email me!

Ask tutorial questions in the Message Board:

myJanee.com Message Board

All material in this site is ©2001-2003 by myJanee.com Graphic Creations. No part of it may be used without my written permission. If you have questions or comments about this site or its construction, contact Janee at myJanee.com Graphic Creations by email.