Photo Restoration I
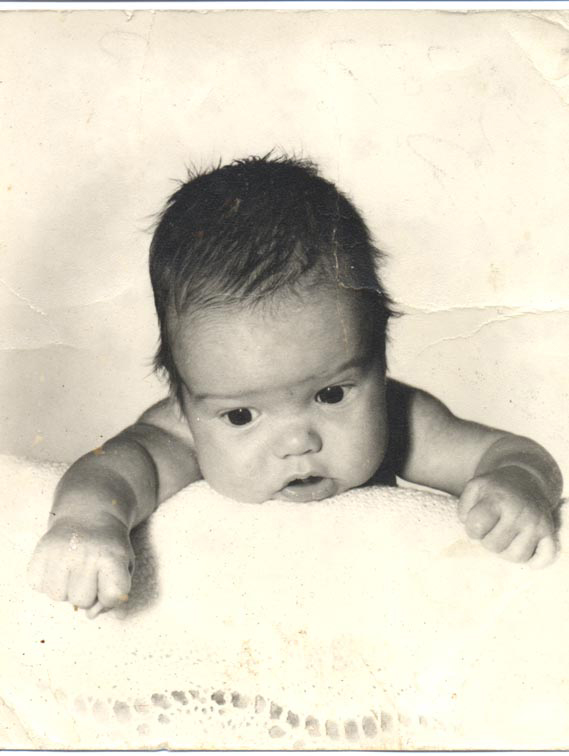
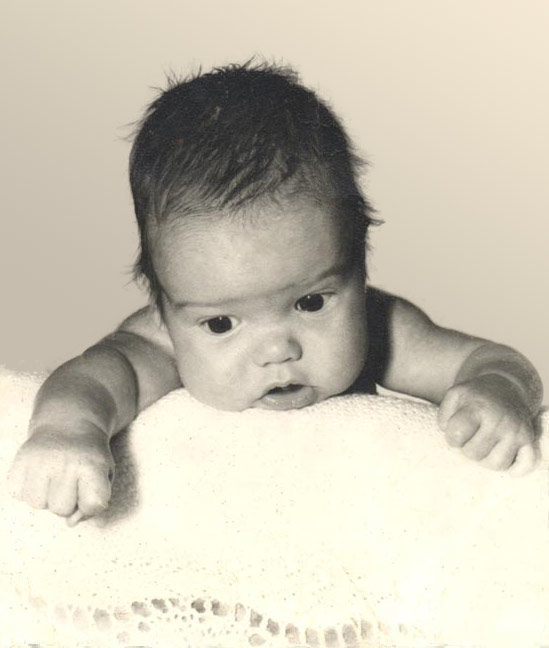
Photo restoration is a huge area, because there are so many types of problems you can encounter. In this tutorial, we'll work with this photo of Jeremy to fix the background and eliminate some mildewy stuff on the photo. If you want to use this photo of Jeremy, you may, for the purposes of this exercise.*
There are different schools of thought on
photo restoration. Some people try to make the picture what they WISH
that it had looked like by sepia-toning or coloring it, removing
clutter around the barn, fixing the peeling paint on the front of the
old church, and so forth, and call it restoration. I think of that as a
different sort of thing, an admirable pursuit, perhaps, but is not a
true restoration. If you are doing this work for someone else, make sure
that both you and your client know what to expect from this work. If
they want sepia toning, you do that. If they want pure restoration, then
you give them that.
Aside from my pearls of wisdom about
"what is restoration?" You will also learn these as you work
through this tutorial:
- Using the Extract command.
- Sampling colors.
- Using a gradient.
- Using the Rubber Stamp.
|

I've reduced this photo a bit for the sake
of page size, but if you want to use it for your exercise, click on this
one and you can get
the full-sized version.
Then right-click on that copy and choose Save as... to move it to your hard drive.
You can also copy it directly into PS.
- After you click the above to get the full-size image, right-click and choose Copy Image.
- Go to Photoshop and File > New.
- Ctrl-V to paste the image into this file.
|
|
|
1. Assess the situation and make a plan. I find several areas that I want to fix here. Examine this photo and pick out the problem areas for yourself before you click HERE to see what I intend to fix.
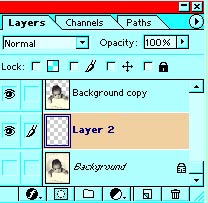
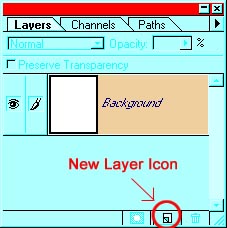
2. Before we do ANYTHING, drag the layer to the new layer icon at the bottom of the layers palette to duplicate it. Turn off the eye for the bottom one so that it is not visible.
|
Ok,
let's deal with that background first. Since there is so much wrong
there and the background is very simple, I have decided to remove it and
replace it with a gradient. Then we can redo that shadow if we choose
to.
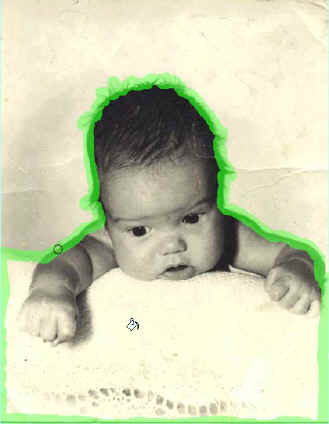
2. As with anything in Photoshop, there are several ways to delete the background. One way is to use the Extract command. To do this, use Filter > Extract. (In PS 6, choose Image -> Extract.) Your picture will open in a new window and you will be given a circle tool which works like a magic marker.
First draw loosely around the part of the picture that you want to keep. Then grab the paint bucket from the upper left corner of that window and fill in the part that you are keeping. Click Preview there in that window et voilà!
What the Extract tool does is to search in the green part for edges. If you need to be very precise and there is not much contrast between your subject and your background, this may not be a good way to do it, because it may delete too much.
|
|
|
|
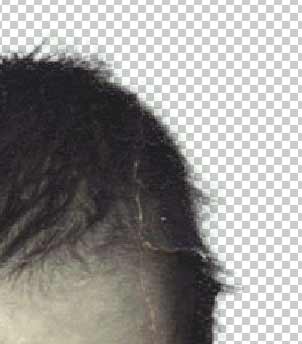
 3.
Zoom in and look at your work. If your edge is not neat enough, you can
clean it up with the extract window's cleanup tools. For your cleanup
pleasure, Photoshop has provided you with the cleanup tool and the edge
touchup tool. Cleanup erases and edge touchup sharpens the edge making a
clearer delineation between your subject and its ultimate background.
The cleanup and edge touchup tools will only become visible after you
have clicked "Preview". 3.
Zoom in and look at your work. If your edge is not neat enough, you can
clean it up with the extract window's cleanup tools. For your cleanup
pleasure, Photoshop has provided you with the cleanup tool and the edge
touchup tool. Cleanup erases and edge touchup sharpens the edge making a
clearer delineation between your subject and its ultimate background.
The cleanup and edge touchup tools will only become visible after you
have clicked "Preview".
When you are satisfied that you have your edge defined well enough, Click OK. Okay?
|
4. Click the new
layer icon to make a new layer for your new background. Drag it below
the extracted baby layer that you just made.
5. Choose your linear gradient tool, either from the flyout under the tool or from the options bar, depending on your version. In your gradient options, be sure that your gradient is foreground to background.
|
|
|
|
6. What we want is to
have the gradient essentially the same colors as the original. Turn the
eye back on on your background baby layer (the duplicate one you made
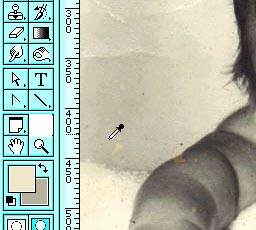
before you extracted the baby.) Click your foreground color square and
then when the color picker box comes up, move your cursor (which
conveniently turns into your eye dropper) over your picture to the upper
right corner to a light spot. Then click OK on your color picker box.
Similarly, make the color for your background color match the lower left corner of the picture, there in the shadow where it is darker.
|
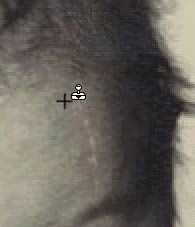
7. Zoom in closely
now, select the cutout baby layer, and let's tackle the scratch on this
cherub's head. Choose your rubber stamp tool (Not the pattern stamp) and
a small soft brush. Notice how the hair grows from the upper right
toward the lower left where the scratch is. Follow one bit of hair up a
wee bit, alt-click there to define your source for your stamp, and then
follow the hair strand back down to the scratch. Drag your stamp across
the scratch. Keep doing that all along the scratch -- alt-click for
source, click for target.
8. Do the same for the scratch on his face, making your source for your rubber stamp very close to your target, as I show here to the right.
|
|
|
|
9. Using
the same small soft brush, rubberstamp out the other place on the
baby that are spotty or discolored.
10. Continue this process with the blanket, getting all those humidity-induced yellow places, taking care to preserve the texture of the afghan.
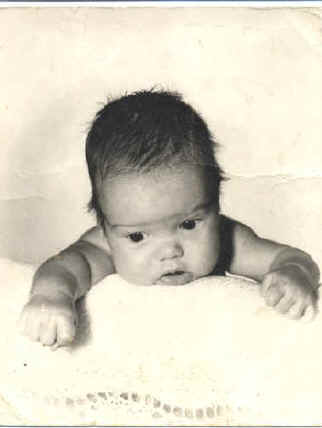
11. Finish it by cropping. By centering the baby and losing that extraneous background, we improve the picture in a way that does not detract at all from the original photo.
Suitable for framing!

More tutorials on photo retouching, restoring, and fixing:
 Changing a head Changing a head
 Basic Photo Restoration Basic Photo Restoration
 Fixing Demonic Pet Eyes Fixing Demonic Pet Eyes
|
|
* I am using
this photo by permission from Glenn W. Holmes who owns its copyright.
|
|
|
|
|
RETURN to Janee's Archive Tutorial Index
email me!
Ask tutorial questions in the myJanee.community:

|
|
|
| All material in this site is ©2001-2005 by myJanee.com Graphic Creations. No part of it may be used without my written permission. If you have questions or comments about this site or its construction, contact Janee at myJanee.com Graphic Creations by email. |
|
|
|
|