Using and Creating Custom Shapes Using and Creating Custom Shapes |
 |
|
See my all NEW Custom Shapes in Photoshop Tutorial!
Custom Shapes came along beginning with version 6 of Photoshop. With Custom Shapes, you can do much more with vector graphics than you could before.
Once you have made a path into a Custom Shape, you can, with a click-drag of the mouse, create a new copy of that shape, in any size, color, or layer style you want, anytime and anywhere.
Let's have a look. We'll begin by making some stars, using the Shape tools. Then we'll have a look at custom shapes, make a custom shape, and finally look at some ways to combine the paths of Photoshop's built-in shapes to make new shapes!
|
This tutorial, which is written with beginners in mind, will show some of the cool ways to use the shape tools in Photoshop version 6 or 7.
Along the way, you will learn about or practice the following ideas and skills:
You will also work with these skills: Saving a file, Making a new layer; Naming a layer; Using the color picker; Duplicating a layer; Using some keyboard shortcuts; Making transformations; Using the Pen tool; Playing with Paths.
Elements has Custom Shapes, too, but you can't create new ones or manipulate them in the same ways you can with Photoshop, since Elements doesn't have the same kinds of path manipulations.
Though little of this will be directly useful to you if your Photoshop is a version earlier than v.6, you may want to read this anyway, to prove to yourself WHY you want to upgrade!
|
| Stars
We do stars by using the Polygon tool and one other little trick. Here we go:
1. File > New .. and make it large enough to take up most of your window. You are just going to play here a bit, so you don't have to save this unless your teacher has asked you to. :)
2. Make a new layer by clicking the New Layer icon at the bottom of the Layers Palette.
3. Choose the shape tool and then the polygon tool in the geometry options.
|
|
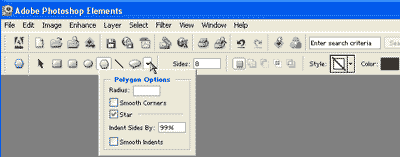 4. On the right side of the geometry options bar, you see an arrow. When you have selected the polygon tool, clicking that arrow will give you the polygon options. 4. On the right side of the geometry options bar, you see an arrow. When you have selected the polygon tool, clicking that arrow will give you the polygon options.
|
|
5. Tick off "Indent Sides" and put in a percentage. Choose a number of sides and what sort of shape you want (shape layer, shape path, or filled region) and a color. If you make a Shape Layer, you can do more finagling with it later, like changing its color (double-click the color thumbnail) or changing its shape (In Photoshop only).
6. Make a new layer and then drag out your .. STAR!
|

|
|
I chose to make a shape layer, so that I could manipulate the path to make this little flower. In "Making a Shape Path," we'll look at how to do this..
|
 |
|
Fun with Custom Shapes
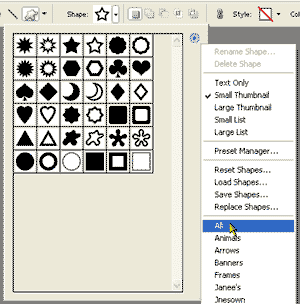
Custom Shapes are very fun to make and to use. Let's explore some of the native custom shapes that PS gives us. Click the dropdown arrow to the right of the Shape showing in the Options bar. This shows you the shapes you have loaded now.
Click the little arrow to the top right on this window and you will see more options. First, you see the different ways that PHotohsop lets you view the shape thumbnails. Then there's the Preset Manager. This is where you rearrange the shapes or delete them from a Shape Library.
Then you see Reset Shapes, Load, Save, or Replace Shapes. At the bottom are Libraries of custom shapes you have loaded. (New libraries you create will not show up there till after you have closed and reopened Photoshop. For now, choose All from this group.
|
 |
|
Make a new layer and click the eye in the star layer you just made so that you have a clean canvas.
Click on the Custom Shape tool and then on the little arrow just to the right of the "Shape" box. choose filled region, pick your favorite shape, and your favorite color and drag out some shapes!
|
 |
|
Making your own Shape Library
Well.. so far these "custom" shapes are just someone else's creations. How do you make and store your OWN shapes? Let's begin this by making an empty library where you can begin to stash your own shapes.
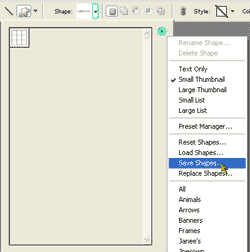
1. Click the down arrow (marked in green to the right) next to the shape in the options bar.
2. Go to Replace Shapes in the arrow on the top of that box. Choose Tiles, because that is the smallest of the Default groups of shapes.
3. Hold Alt and you'll see your scissors. Alt-click to delete... and delete all but one of the shapes there. Don't worry about deleting all of these shapes in reality. You will be able to retrieve them again. 4.
|
|
|
4. Click that right-hand arrow again and choose Save Shapes. Name this new Shape Library "Blank." You'll be able to call up this library if you ever want to build a new one.
Now we'll add a shape of our own creation to this "Blank" library and rename it.
|
|
|
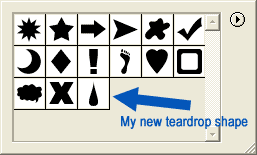
Making a Shape Path.
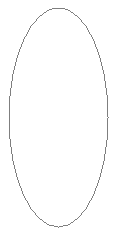
We are going to make a teardrop shape which we will create from an ellipse made with the Shape Work Path format.
File > New.. and make it pretty large, like 1000 pixels square. File > Save as .. and make it PSD format and name it teardrop.psd or raindrop.psd. Hey.. I can be flexible!
Here's how to make an ellipse Shape Path:
- Choose the Shape tool and then the ellipse from the Options bar.
- Click the Work Path button.
- Drag out an ellipse. We will use this ellipse in the next part. Waste not; want not!
|
|
|
Creating custom shapes
Photoshop comes with some custom shapes and you can get others from the 'net and from other sources, but it can be very handy to be able to make your own. Here, we are going to make our own custom shape, a teardrop.
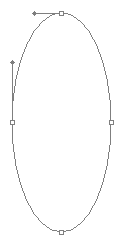
- Start with the ellipse shape path that you just made. (A)
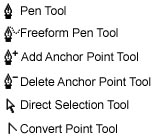
- Choose the Delete Anchor Point tool (under the pen tool). Notice that the tool is now a white arrow. But when you touch it anywhere on the ellipse, it selects the path so that you can work with it! (B)
- Using the Delete Anchor Point tool, click the two anchor points on either side of the ellipse. This leaves just two points, one at the top and one at the bottom of your ellipse. (C)
- We need to make the top point.. pointed. To do this, choose the Convert Point tool located under your pen. Click it on the top vertex and watch it go pointed! (E)
- If you want to make the point more pronounced, drag your Convert Point tool off from this pointed vertex and handles will come out. Release your mouse. Pull the handles down into the shape as i have done here to make your teardrop. (F)
- If you need to move the points around, while you have the convert point tool in use, hold ctrl and your tool will turn to the white arrow! Touch it on the point you want to move and scoot it along. Try dragging your top point a little higher and make your drop thinner. Then adjust it back where you want it.
|
|
- Next we will make this into a custom shape. First, be sure that you have open the Shape Library to which you want to add this new shape. Click the dropdown arrow next to the shape itself in the Options bar. Then click the arrow to the top of that window. (Shown in green)
If you've been following along above, you will have the Blank library open. This is good. Once you add your teardrop, you'll rename the Library.
|
|
- Click your Paths Palette and then click your path in the palette. Edit > Define Custom Shape.
(If this option is grayed out, make sure that your path is selected. Click its path in the paths palette if it is not selected. Still not available? Choose the white Direct Selection Arrow from the toolbox and click the path on the canvas.)
- Now, click your custom shape tool in the toolbar and then on the arrow beside where it says "shape," and there it is! Your own teardrop!
Saving the new Shape Library
Now to save this so that it will be there for posterity, click the little arrow to the top right of that dropdown and click "Save Shapes." (Notice while you are there, that this is the same box you would use to load new shapes from another source.) Give your new library a descriptive name.
|
|
|
Using your Custom Shape
Try out your teardrop!
- Make a new layer.
- Choose your favorite color for tears from the color picker and then choose the shape tool and the custom shape tool.
- Click on your teardrop in the dropdown under the "Shape" arrow.
- Now drag out drops to your heart's content! For more on making rain look rainy, check out my Raindrops tutorial.
I Ctrl-clicked my layer with the raindrops to convert all of the drop pixels into a selection. Then I dragged a gradient across it. A Layer Effect (bevel/emboss ) later, here is my result!
|
|
|
For more on Shapes in Photoshop, see these tutorials:
 Basic Shapes Basic Shapes
 Pearly Button Pearly Button
 Show me a Sign! Show me a Sign!
 What's the Vector, Victor? What's the Vector, Victor?
(examining vector vs. raster graphics)
Using and Creating Custom Shapes
 More Creating Custom Shapes More Creating Custom Shapes
For more on resizing vector paths for logos, see this tutorial:
 Love Your Pen: Enlarging Logos Love Your Pen: Enlarging Logos
|
I hope you enjoyed getting into Shape with me in this tutorial!
Always me,

|
|
|
RETURN to Janee's Tutorial Index
email me!
Ask tutorial questions in the myJanee.community:

|
|
|
| All material in this site is ©2001-2003 by myJanee.com Graphic Creations. No part of it may be used without my written permission. If you have questions or comments about this site or its construction, contact Janee at myJanee.com Graphic Creations, 7193 W Gifford Rd, Bloomington, Indiana, USA 47403 or by email. |
|
|
|
|

 B
B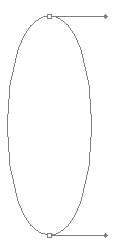 C
C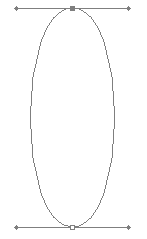 D
D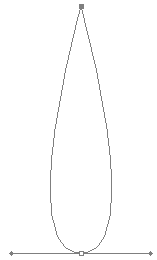 E
E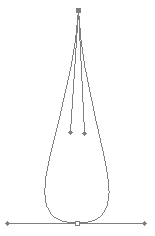 F
F