|
 Replacing a Defective Head Replacing a Defective Head
Though not a "beginners' level" tutorial per se, this activity can certainly be performed by someone who is just starting to learn their way around in Photoshop. In working through this activity, you will gain practice with these techniques:
- Making and altering paths with the pen tool and creating a selection from that path.
- Using Transformations to resize and distort objects.
- Using levels to correct lighting and contrast.
- Using layers to make corrections to blend an object into its background.
|


|
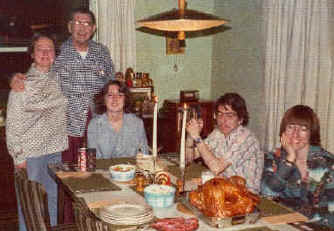
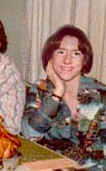
| Eyes closed? Goofy expression on one person but the rest look fine? Don't despair; just give that one person a new head!
I didn't like the way that girl (me) looks on the right side of this turkey picture.
|
 |
|
|
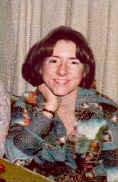
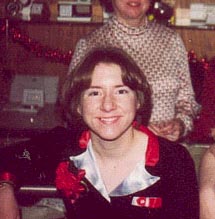
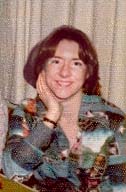
| I chose this head to put onto the turkey picture. We will see how it goes. The coloring is quite different, as is the tilt of the head.
Here's what we're going to do:
- Select the head and move it to the new canvas.
- Tidy up the new head, getting rid of all the background.
- Make the new head "fit" the scene.
|
 |
|
1. Select and move the head.
a. Zoom in, and, using the Lasso tool, draw loosely around her head to select it from this picture.
|
 |
| b. Type V to switch to the moVe tool and drag the cut-out head over to the turkey picture. Ctrl-D to deselect.
File -> Save As... and choose a name for your file.
2. Tidy up the new head.
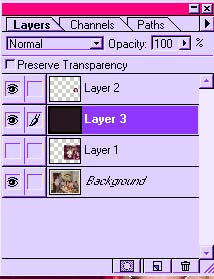
a. Now we'll add a layer of black and place it behind the cutout head. This will enable us to easily see what needs to be trimmed here. Proceed as follows:
- Click the Create a New Layer icon at the bottom of the Layers palette. (looks like a page turning)
- Choose black for your foreground color in the color picker in the toolbar.
- Alt-backspace to fill the layer with this foreground color.
- Drag the black layer to beneath the head layer in the Layers palette, as shown to the right.
|
 |
|
Note: There are many ways to clean up the background behind the head. Here, I'm using the Pen Tools, because the line of her hair is smooth, and these tools will enable me to get a nice smooth curve.
Another way to clean up the background would be to use a Quickmask or Layer Mask. There is more on selections and cleaning up backgrounds in THIS tutorial.
If you choose another method of getting rid of the background, do it and then skip down to step 3.
|
b. Using the Pen Tool, with Path option selected in the Options bar, more carefully trace a path around her head. Don't worry if this isn't exact. We will finish trimming up her hair later. Ctrl-S to Save.
|
 |
|
c. Now to adjust the path, hold the Ctrl key as you click on the anchor points in the path to adjust the path.
If you need to change the curvature of part of the path, you can do this with the pen tool. Hold the Ctrl key and drag the direction lines by their little black end points. It will take a bit of experimentation to get it, but once you do you will realize how cool the pen tool is!
(For more on how to use the pen tool, check the Heart tutorials.)
Ctrl-S to Save.
|
 |
|
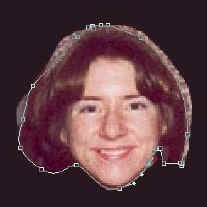
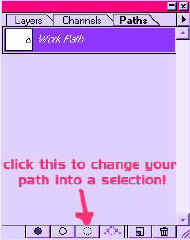
d. Now make your path into a selection, by clicking the dotted circle icon at the bottom of the Paths palette. You will see marching ants trooping around your selected head.
e. Choose the Head layer in the Layers palette. Select -> Inverse ... and hit the Delete key.
Ctrl-D to deselect.
f. You are now done with the black layer, so drag it to the trash can icon in the layers palette.
|
 |
| 3. Make the new head "fit."
Position the head on your picture and evaluate the situation. We are going to need to do some color adjustment for sure. And, although this subject tends to be big-headed, we will need to deflate her head a bit as well.
|
 |
|
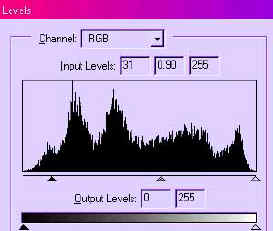
a. I don't like the coloring in the original turkey photo. Let's brighten it and increase the contrast using levels. Here are the settings that i ended up with for my sliders. Your mileage may vary.
|
 |
|
b. With the head layer selected in the layers palette, Edit -> Transform -> Free Transform and hold the shift key as you drag the corner of the bounding box to make the head smaller.
When you hover just outside the bounding box, you get a curved arrow. I dragged that arrow to add a cute little tilt to the head.
|
Perspective might be another necessary transformation for you, depending on your subject.
If you hold the Ctrl key whilst you have the Free Transform bounding box active, you can drag corners or sides to distort the head to better fit its new body.
|
| c. Fix the color of the head to match the rest of the scene. This is the levels palette that i used. It is important to make sure that the lighting and shadows are the same in the added parts as they were in the original.
|
 |
d. In the original, her hand is showing in front of her hair. I want to try that to see how it looks on this new head:
- First, drag the head layer to the new layer icon (next to the trash can In the layers palette).
- Then, still in the layers palette, change the opacity for the head layer till you can still see it, but you can also see behind it. I used 55%.
- On the head layer, erase the part of the head that is covering the hand.
- Turn the opacity back to 100%.
|
|
e. I still don't like her hair at the bottom right side of her head in the above picture.
- That little tuft of hair to the right on the picture.. retouch that out using the rubber stamp on the curtain behind her..
- Then erase a bit of hair on the head layer on the right and trim up the left side of her hair by erasing with a small soft brush.
You are ready to flatten it, if you want, or, better yet, File -> Save as, keeping the layers intact in your psd file.
|
f. On your image, you may need to use the blur tool (the water droplet under the smudge tool) around the edges of the head just a bit in order that it look natural in its new setting.
<
|
|
|
|
I hope you have had fun with the activities in this tutorial and that you picked up some tidbits along the way!
Always me,

|
|
|
|