Hearts
Heart 1
In this tutorial, written with beginners in mind, you will learn how to conquer your pen tool to make a valentine-type heart. This design requires NO drawing at all. Honest.
In the process of creating the heart, we will practice the following techniques:
- Drawing an outline with the pen tool.
- Adding and subtracting anchor points.
- Moving anchor points around.
- Reshaping a curved segment using direction points.
- Using the Delete Anchor Point tool, the Add Anchor Point tool, and the Direct Selection tool.
- Outlining an object.
- Coloring an object.
- Using Snap-to Guidelines for precision.
Though this tutorial was written with version 5.5 (yes, really!), most of it is the same or very similar in all of the newer versions.
|


Linked items are explained in more detail at "Start at the Beginning."
Note: The images in this tutorial are fuzzy. Do not adjust your monitor! <g> When i did the screenshots for this tutorial, I was going for small filesize and i had not yet learned the wonders of using gif for simply colored images like these.
|
| 1. First we will make a path for the heart, using the Pen Tool and Snap-to Guidelines.
a. Begin by setting up your file, layer, and making your guidelines:
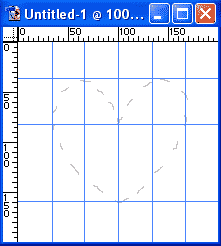
- File -> New and make your canvas 500x500. Use RGB color mode and 72 ppi, the best resolution setting for web use. (If you were going to print this, you would use 300 ppi.)
- Make a new layer by pressing the Create a New Layer icon at the bottom of the Layers palette.
- View -> Snap To Guidelines (be sure that it is checked). Then drag out guidelines as i have just below. (You drag them out from the rulers. If you don't see rulers, click on View -> Show Rulers.)
Their exact placement is not critical.
(These guidelines are just to show you a way to achieve more precision. You don't HAVE to use them to do a heart.)
|
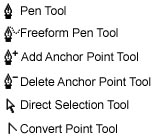
Your pentools are in your tools palette all under the same button. Whenever you see the little tiny triangle in the tools palette, that means you have more tools underneath. Click and hold the button to see the other tools in the flyout.
|
( Here, i've sketched where my heart will eventually go.)
|
| b. Now to use the pen tools to make the path. The pen tools are all under the Pen Tool in your toolbox. Click and hold the tool button to see the flyout.
In later versions of PS, in the pentool options bar at the top, be sure that the PATHS button is chosen.
- With your pen tool, click for your vertices counter-clockwise in order to make the shape like i have here. If you mess up, use the history palette to click back to where you were before your messup and do it over.
|
 |
c. Right now these are straight segments. Next we are going to manipulate the anchor points to make the curves:
- Choose your Convert Point tool (under the pen tool).
- Click it on one of your vertex points at the top of your heart and drag your mouse along one of the guidelines. Doing this creates direction points from that anchor point.
- Click on one of the direction points and wiggle it around and see what it does. You can custom-shape your curve with these! These are called Bezier curves. If you learn to use these, you will never have to worry about shaky hands or "I can't draw a straight line" concerns again! These will go a long way toward making you an artist!
- Mess with them till you like the look of your upper curves.
|
 |
d. I don't like those straight segments on the bottom. Fix them as you did above with the Convert Point tool:
- Hold it on the left-side point and drag it down as shown to the right, till you get that nice smooth transition into the top curve.
- Then click it again and continue dragging it down to smooth out the lower curve.

|
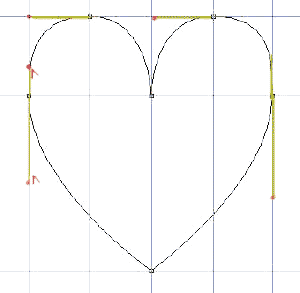 |
- For the right side, you will be dragging up from the vertex to round the top part further and then you will drag down to round out the bottom segment. That's because we drew our initial heart in a counter-clockwise direction.
|
If you need to adjust a curve after you have already "converted" its point, you hold the ctrl key as you click on that anchor point and you get the direct selection tool. This brings back your direction lines and you can pull or prod them however you like to fine-tune your curves. Try this.
|
| 2. What you have now is a PATH. You can do many things with a path. What we are going to do is fill it, modify it to make it a little wider, and then stroke it to make the border.
a. To fill a path, you have to have a layer for the fill to go. You also have to have a color.
- Click on the Layers palette. Click on Layer 1 to select it if it is not selected. (If you do not have a layer selected in the layers palette, the stroke and fill buttons will be grayed out.)
- In the color picker, choose an appropriate color for your heart
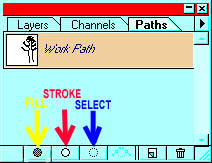
- Click on the tab for the Paths palette. The little icons at the bottom of that palette will do just what they say when you hover over them. The first one fills the path. Click it.
|
|
|
b. For the dotted heart border (See the finished heart at the bottom of this page), you need to modify the path. You can use the pen tools to adjust it, or you can transform the path. Here, let's transform the path.
- Select the path by clicking on it in the paths palette.
- Then choose the Direct Selection Tool (the white arrow -- you can get it from just above the Pen Tools) and click the path on your canvas. The anchor points should show up now.
- Edit -> Free Transform Path. Pull the corners or the sides of the bounding box to where you want them.
- If you want the border to get bigger, but centered the same as your original, and in the same proportions, hold Alt-Shift while you drag. (Alt drags from the center; Shift keeps the proportions.)
|
(In newer versions, you choose brushes in the brush options bar. Click the arrow beside the brush that is showing toward the left and you will get your brushes palette. Or you can hit enter on the keyboard.) To set spacing, click the brush itself in the options bar (NOT the arrow beside it))
|
|
c. To stroke the modified path, you need a layer for the stroke to go, a color with which to stroke, and a brush. Here's what we do:
- Make a new layer, by clicking on the Create a New Layer icon at the bottom of the Layers palette.
- Choose a color for your dotted border in the color picker.
- Choose one of the hard round brushes in the Brushes palette.
- In version 7, go to the Brush Options tab and click the words Brush Tip Shape. Change its spacing to 200%, or till you like the look of the stroke. Turn OFF shape dynamics or any others of these options. (Actually.. color dynamics and scatter and the others are fun to try, too!)
- Be sure your brush is active by clicking it again in the toolbar (or type b).
- Click the Stroke path icon in your paths palette.
- Click somewhere outside of the path bar in the paths palette to turn off your path.
YAY! There you are!
I hope you enjoyed this tutorial.
|
|
| More ideas of things
you can do with these hearts.
|
I offer my heartfelt welcome to you to try Heart 2, 3, and 4!

|
|
|