Hearts -- Heart 3 Hearts -- Heart 3 
In this tutorial, you are going to use the Pen tool and alpha channels to create a 3D-looking valentine heart.
As you work through this tutorial you will learn about the following:
- Using Alpha Channels and lighting effects to create a 3D looking object.
- Using Alpha Channels to save a selection.
- Transform a selection.
- Modify a selection.
- Using Layer Effects.
|
Though this tutorial was written with version 5.5, most of it is the same or very similar in version 6. Where i thought it necessary, i have put special version 6 instructions in parenthesis in purple.
|
| The steps for this tutorial can be summarized like this. First we will make the Alpha channels. Then we will render the texture onto a red layer, creating a red textured heart. Finally, we will trim and finish the heart.
1. We begin by making the Alpha Channels. First we will make the original heart shape in an Alpha Channel. (Don't worry if you don't know what this means. You will in a minute!) Then we will make the texture channel.
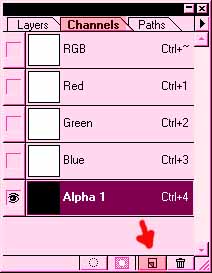
a. Make the Original Alpha Channel.
- Click on the tab for the Channels palette.
- Click the New Channel icon at the bottom. (See at right.)
|
|
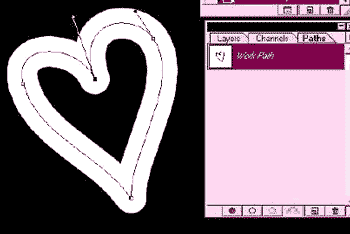
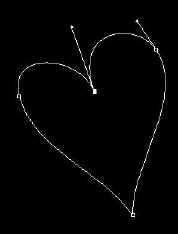
b. Make the path for the heart shape.
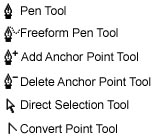
- Choose the Freeform Pen tool.
- Use the control points and anchor points to adjust it till you are happy with its proportions and lines. (If you find this difficult, you may wish to work through "Heart 2" first.)
- File -> Save As ... and choose a name for your file.
|
 |
|
c. Stroke the path.
- Select a wide hard brush. In brush options, set the spacing to 1%. This makes your line as solid as possible.
- In version 7, spacing is under brush tip shape.
- In version 6, you choose brushes in the brush options bar. Click the arrow beside the brush that is showing toward the left and you will get your brushes palette. (Or you can hit enter on the keyboard.) To set spacing, click the brush itself in the options bar (NOT the arrow beside it)
- In version 5.*, you click the arrow at the top right of the brushes palette. Click brush options and set the spacing to 1% there.
- Type the letter d to make your colors the Defaults. (In channels, default colors are white on black; in layers, they are black on white.)
- Click the tab for the paths palette.
- Down at the bottom of that palette, click on the stroke path icon.
- You are done with this path so while you are in the paths palette, drag the path to the trash can there at the bottom. :)
|
|
|
|
|
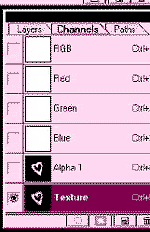
d. Make your Texture Channel, which will be a blurred and trimmed heart.
- Return to the Channels palette.
- Duplicate the Alpha Channel you just made by dragging it to the new channel icon at the bottom of the palette.
- With Alpha Channel 2 selected, double-click it and name it "Texture."
- Filter -> Blur -> Gaussian Blur. (I used a setting of 10 pixels.)
- File -> Save.
|
|
|
|
|
e. Now to trim the heart in the Texture Alpha channel.
- Be sure you have black for your background color in the color picker.
- Ctrl-click on Alpha 1 while you still have the Texture channel selected. This sends marching ants around through the blur of the Texture channel.
- Select -> Inverse.. and hit the Delete key to trim your heart.
- Ctrl-d to deselect.
|
 |
| 2. We still have nothing in the layers. And we have done nothing in color! Let's change this! To get the 3D heart, we will render the Texture Channel onto a layer of red using lighting effects. Sounds like a creepy thing to do, but hang with me. Here we go:
a. Click Layers to go to the Layers palette. Click the New Layer icon at the bottom and then click that layer to select it.
b. Choose a color in the color picker and then alt-backspace to fill your layer with it.
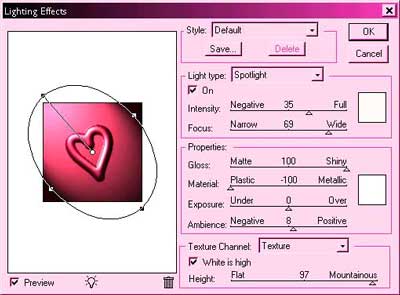
c. Now this part is cool. Filter -> Render -> Lighting effects. In the dialog box at the bottom it says Texture Channel. From the drop-down box, choose your Texture Channel.
Then shine the light around from different directions by dragging the little point that is on the oval. Play around. You can't break it! Experiment with different settings for mountainous and for materials, etc. Have some fun here.
|
 |
|
Once you find a setting you like, click OK.
File -> Save.
d. Trim the heart. Click on the channels palette and ctrl-click the Alpha 1 channel. Select -> Inverse -> Delete. Ctrl-d to deselect.
File -> Save.
A drop shadow would be a nice addition to this, too! I hope you enjoyed this tutorial. If you like this one, go on to heart 4!
|
 |
|
|
|
What can YOU think of to do with the hearts you make? Send me your heart! :)
Student work (More here!):
|
|
|
|
|
|
|
|
|
|
|